Categories
Job Aides

Invoicing – Creating and Applying Credit Memos

Effectively managing accounts receivable is essential for maintaining accurate financial records. Credit memos help adjust or correct invoices as needed. This job aid provides step-by-step instructions on how to create and apply a credit memo in Aspire.

Steps to Create and Apply a Credit Memo:

1. Access the Credit Memo Menu and Select “New Credit Memo”

  • Log in to your Aspire account.
  • Select “New Credit Memo” from the menu.

Credit Memos

2. Select the Payment Account by Entering the Company Name and Apply

  • Enter the company name associated with the credit memo.
  • Click Apply to confirm the selection.

Credit Memos

3. Enter Billing Information

  • Enter the billing contact, branch, and billing state to ensure accurate processing.

Credit Memos

4. Enter Credit Details

  • Add the credit amount, division, sale amount, and taxable amount accurately to reflect the proper credit adjustments.

Credit Memos

5. Save the Credit Memo

  • Click Save to finalize and record the credit memo in the system.

Credit Memos

Utilizing credit memos in Aspire enables precise invoice adjustments, ensuring accurate financial tracking. Following these steps streamlines the process for managing credits efficiently.

Download a PDF version of the job aide here.

Categories
Job Aides

Creating and Updating Deposits in Aspire

Efficient deposit management is essential for maintaining accurate financial records and streamlining accounts receivable. Aspire provides a structured approach to handling deposits, allowing users to process payments seamlessly. 

This job aid will guide you through the process of creating and updating deposits using the Aspire dashboard. Follow these steps to ensure accurate and organized invoicing.

Steps to Create Deposits in Aspire

1. Go to Aspire Dashboard and Select Invoicing

  • Log in to Aspire and access the main dashboard.
  • On the left-hand side, find the menu and choose the invoicing section.

invoicing

2. Click on Payments and Select Online Only from the Drop-Down

  • In the invoicing section, locate and select the “Payments” option.
  • In the payment options, choose “Online Only” from the drop-down menu.

invoicing

3. Select Field Name and Choose the Contact Names then Click Apply

  • Use the filter option to select “Contact Name” and pick the required contacts.
  • After selecting the contacts, click the “Apply” button to update the list.

4. Select Create Deposit

  • Choose a contact by ticking the checkbox, then use the drop-down menu on the right to select “Create Deposit.”

5. Enter Deposit Date, Then Click Save

  • Input the deposit date in the required field and press “Save” to confirm.

6. Repeat for All Contacts You Want to Process

  • Follow the same steps for all the contacts that require deposit creation.

7. Switch to Deposit and Review

  • Navigate to the “Deposit” section to review your updates.
  • The system will now show the latest deposit entries you have made.

By following these steps, you can efficiently manage deposits in Aspire, reducing errors and maintaining accurate financial records. Regularly updating deposits ensures a smooth invoicing process and helps keep accounts receivable well-organized. Implement these best practices to enhance financial accuracy and improve overall business operations.

Download a PDF version of the job aide here.

Categories
Job Aides

How to Generate Invoices for “Fixed Price Open Billing” Invoice Type

Invoices with the “Fixed Price Open Billing” type cannot be generated normally because the checkbox is not available in front of the invoices to select them and generate using the Bulk Actions option. This job aid provides a step-by-step guide to help you generate these invoices correctly using the Aspire Dashboard.

Steps to Generate “Fixed Price Open Billing” Invoices

1. Open Aspire Dashboard and Click on Invoice

  • Access the Aspire Dashboard by logging in.
  • Navigate to the “Invoice” section from the main menu.

Fixed Price Open Billing

2. Search Your Invoice Number and Click on Your Invoice

  • Use the search bar to locate the specific invoice number you need to generate.
  • Select the desired invoice from the search results to open its details.

Fixed Price Open Billing

3. Click on New, then Click on Add Invoice

  • On the invoice screen, click “New” and then select “Add Invoice” to proceed.

4. Enter Invoice Amount, then Click Save

  • Input the correct invoice amount in the relevant field and click “Save.”

5. Enter Invoice Date and Click Save

  • Specify the invoice date in the field provided and save your changes.

6. Tick the Check Box, Click on the three Dots, Select Complete Batch, and Click Confirm

  • Select the checkbox for the invoice, click the three-dot menu, choose “Complete Batch,” and confirm the action.

7. Select File Type and Click Print

  • Choose the required file type for the invoice and click “Print” to generate the document.

Generating invoices for the “Fixed Price Open Billing” type requires a different approach due to the absence of the checkbox in Bulk Actions. By following these steps, you can efficiently create and process these invoices in the Aspire Dashboard.

Download a PDF version of the job aide here.

Categories
Job Aides

Creating a Miscellaneous Invoice in Aspire

A miscellaneous invoice is an essential tool for managing non-standard transactions, allowing businesses to handle billing efficiently for services or adjustments that fall outside traditional invoicing practices.

Common uses include adjusting invoices, billing for services like shipping or installation, recording project costs, or charging for additional work. Unlike standard invoices, miscellaneous invoices in Aspire cannot be printed, use a Sales Journal number instead of an invoice number, and do not affect the numbering sequence of other invoices.

This job aid provides a detailed, step-by-step guide to creating a miscellaneous invoice in Aspire, helping you streamline your accounts receivable process and ensure accuracy in billing.

Steps to Create a Miscellaneous Invoice

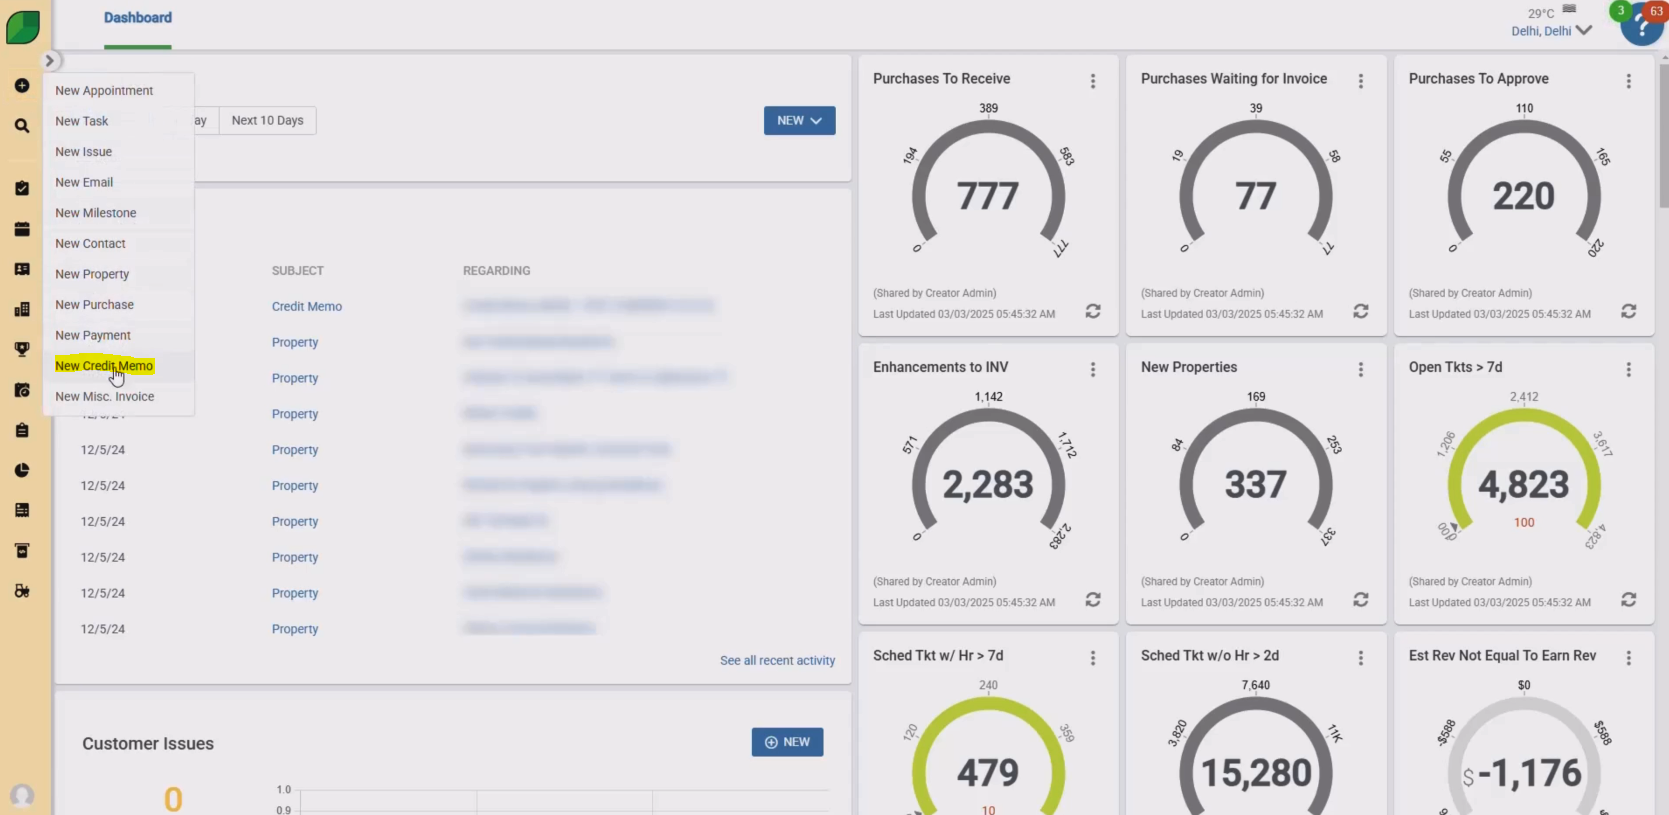
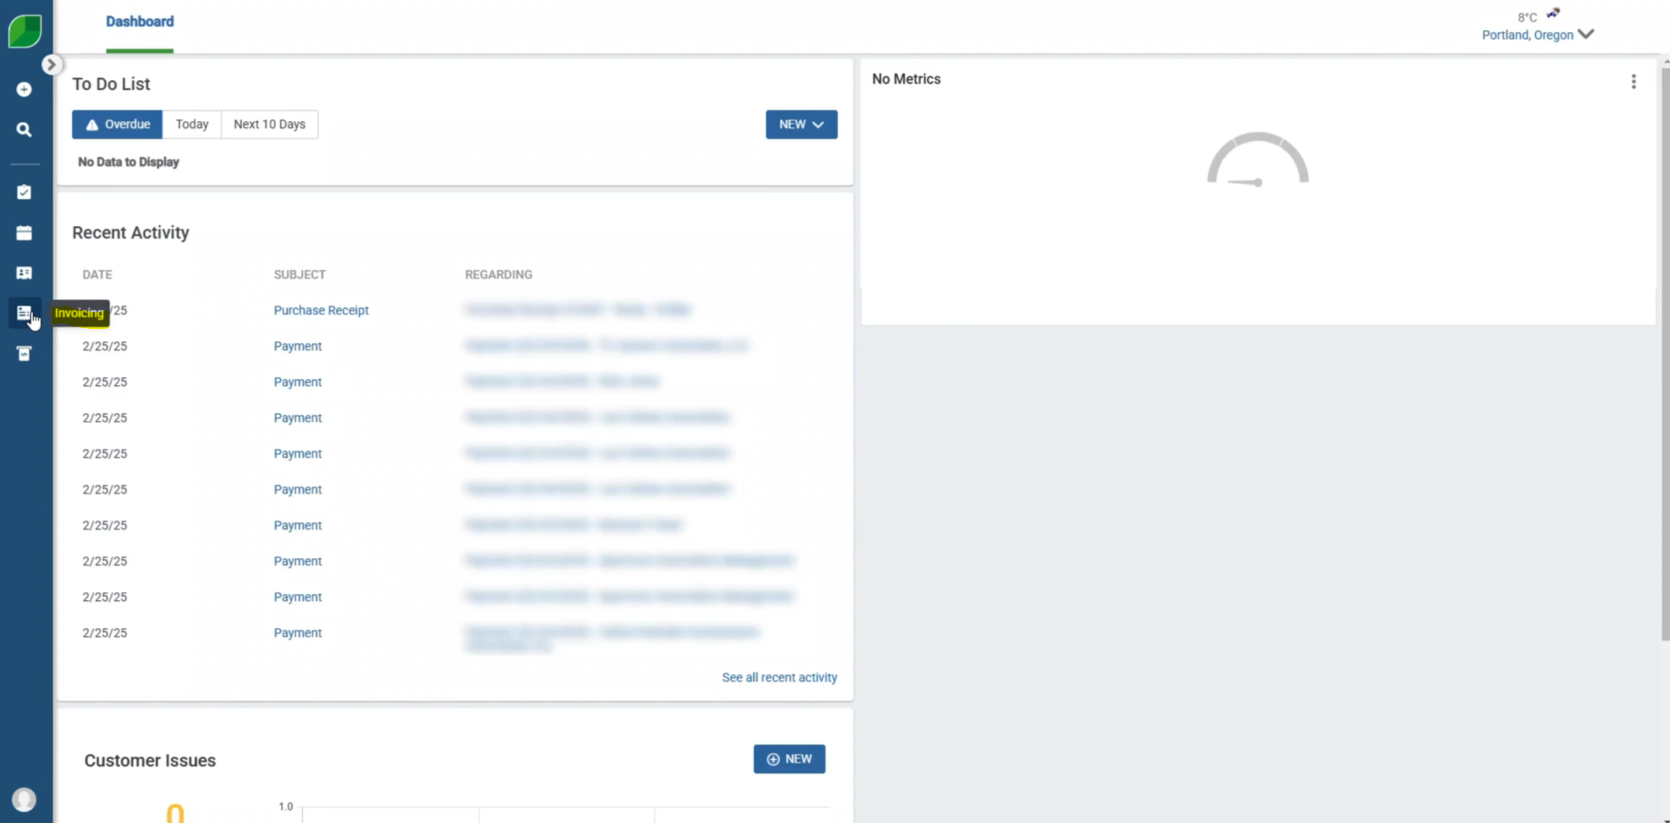
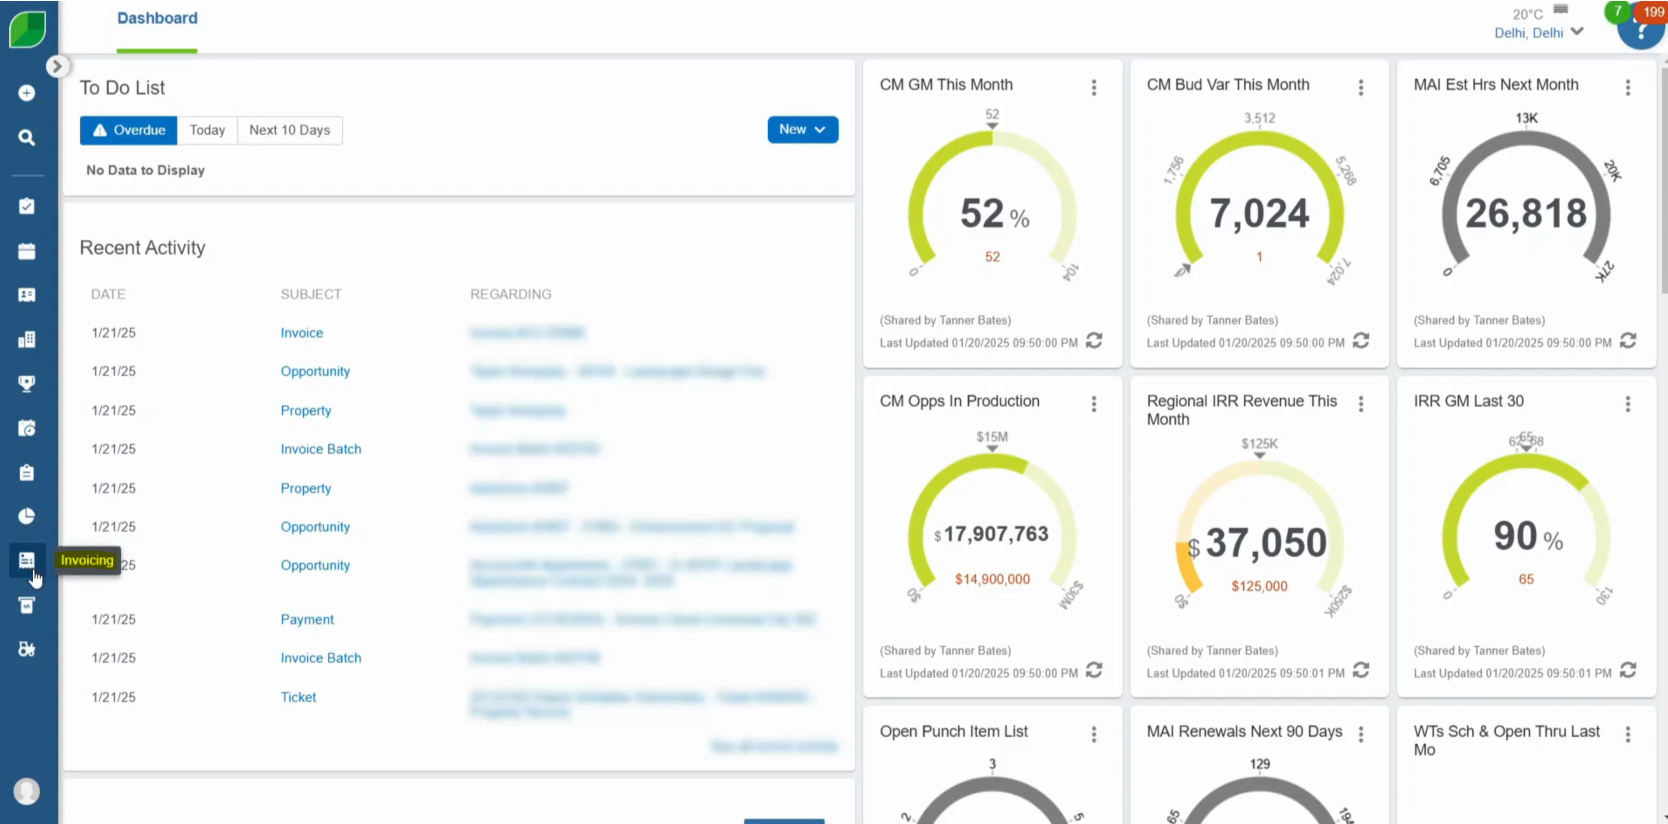
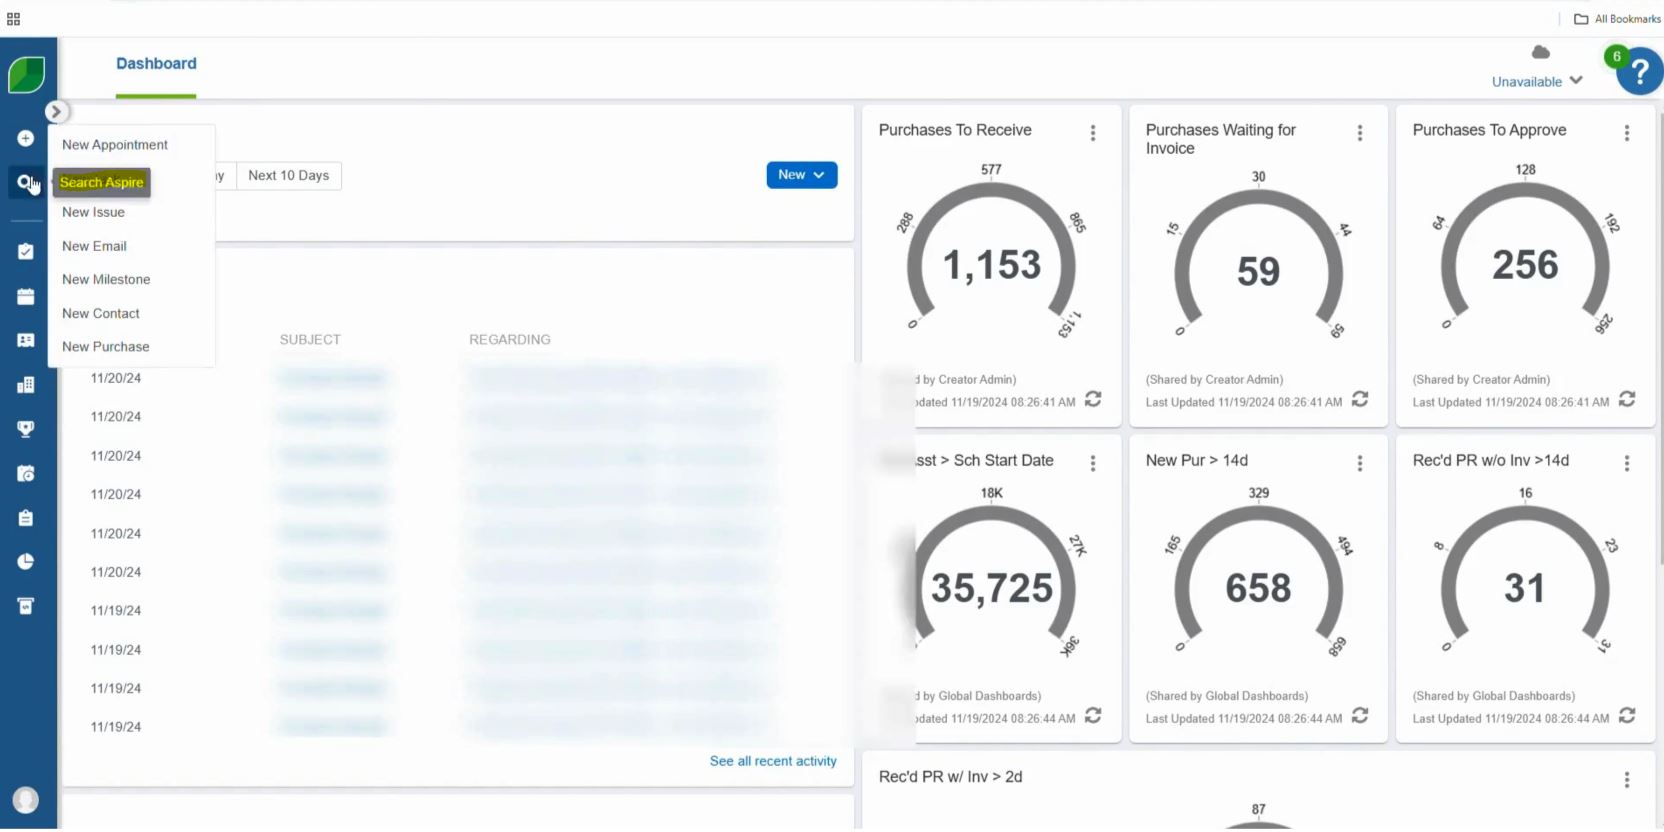
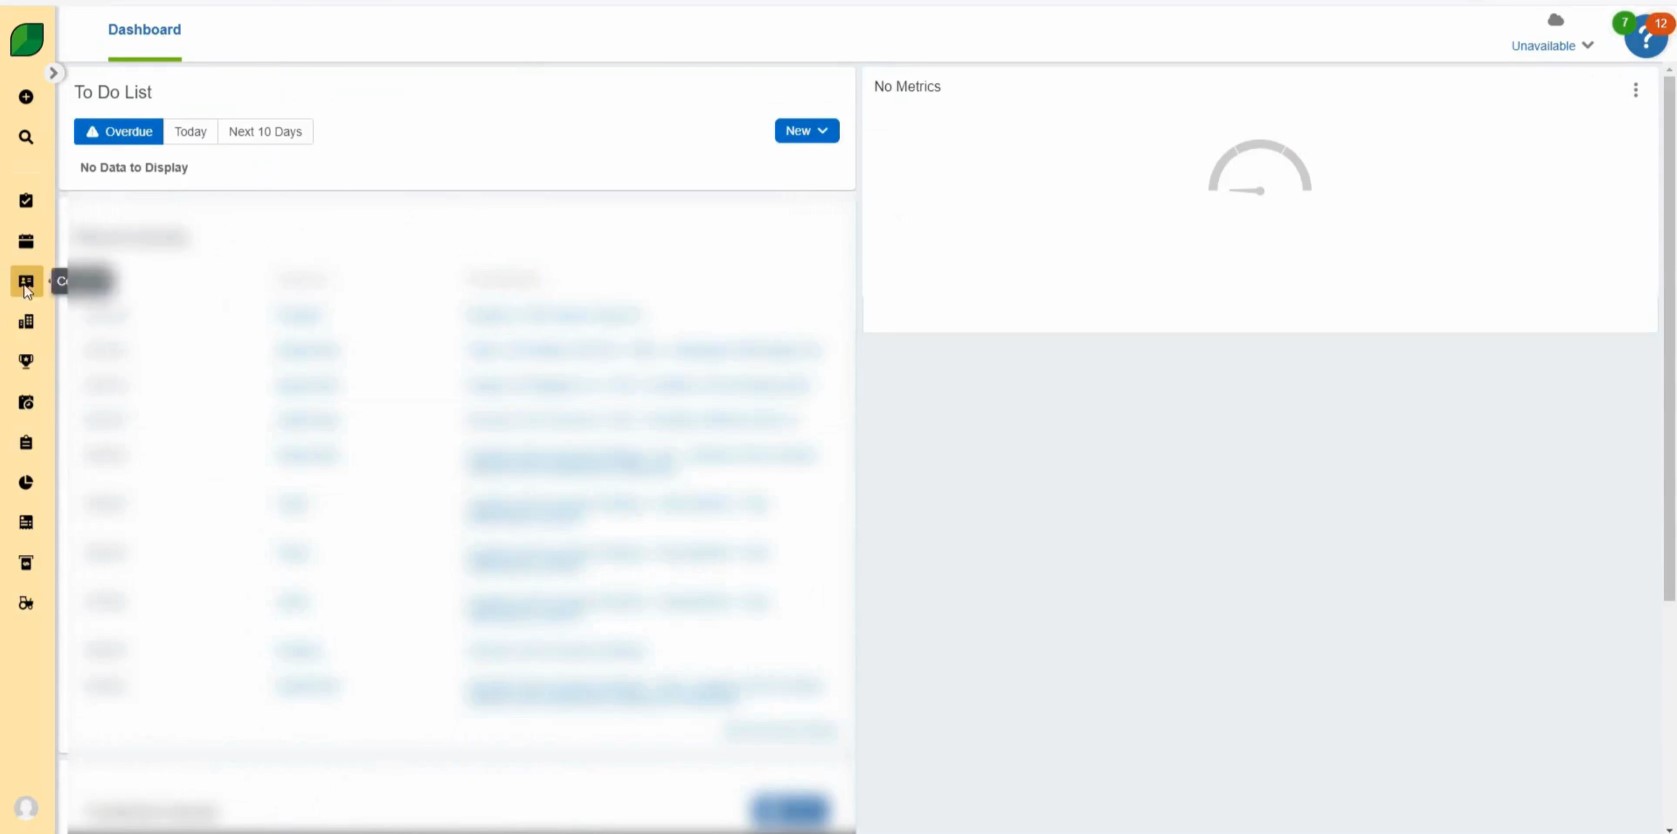
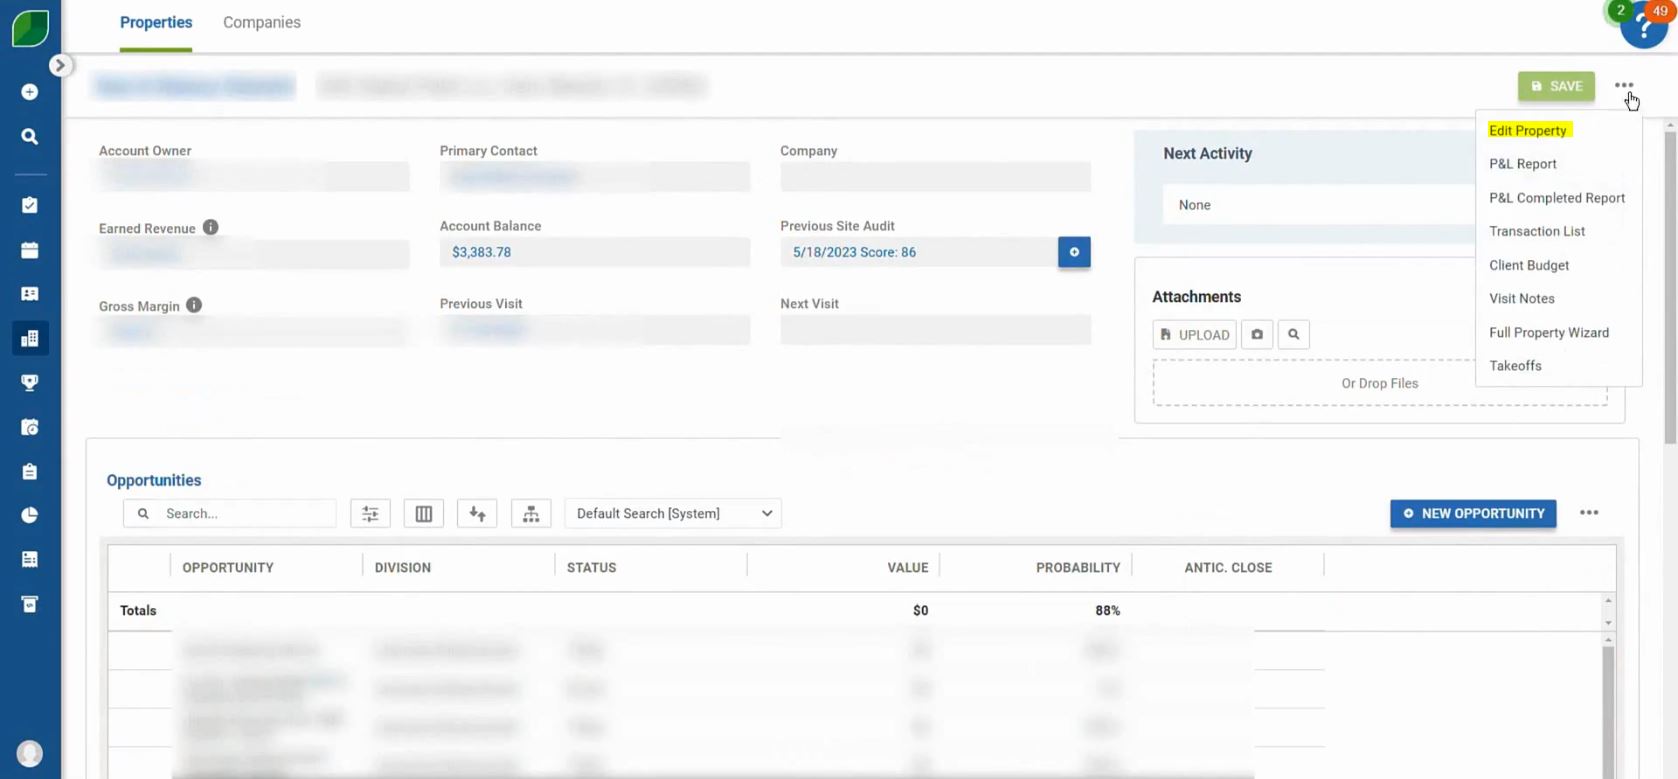
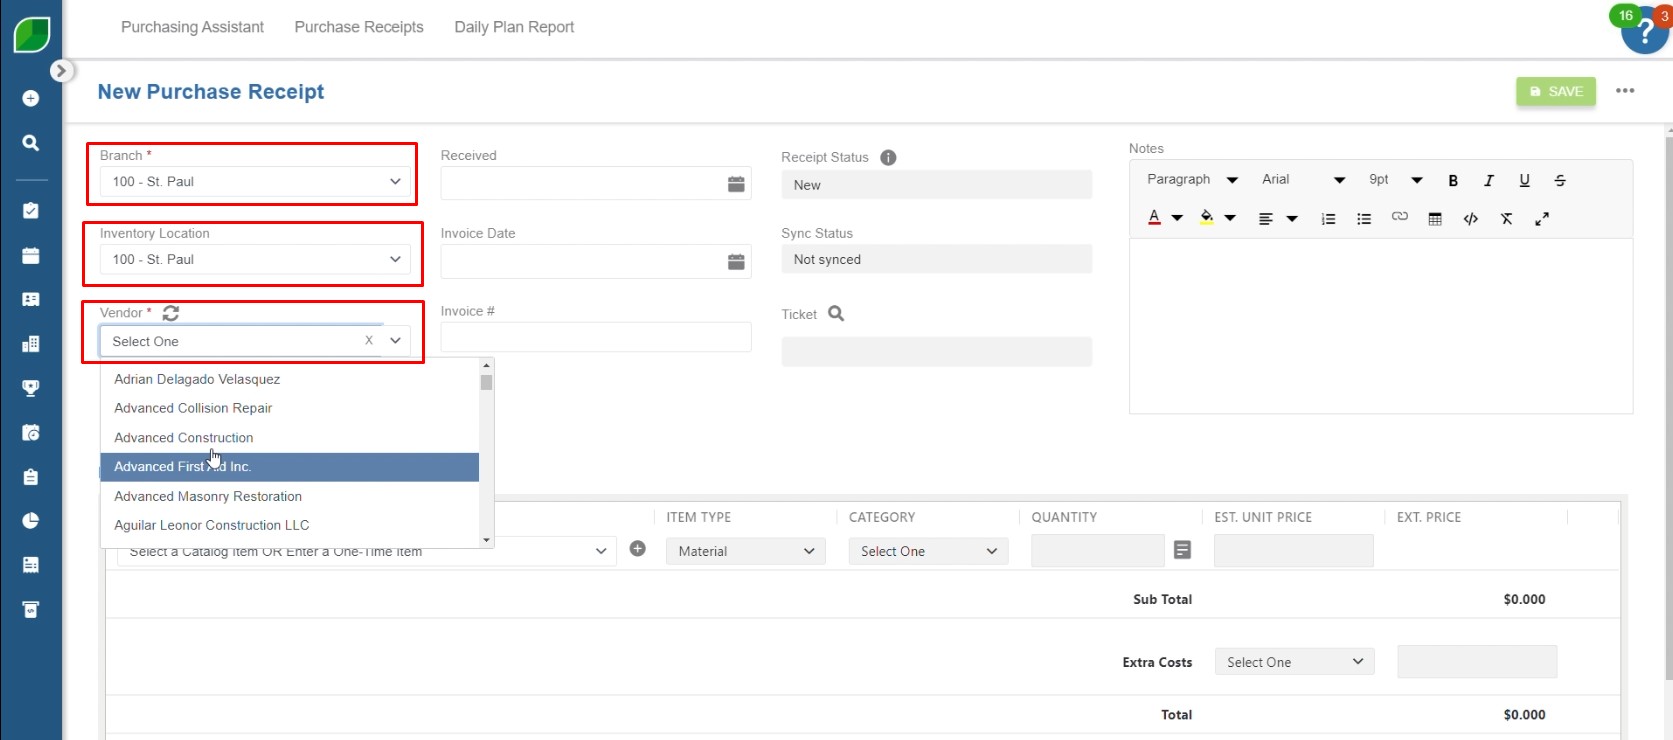
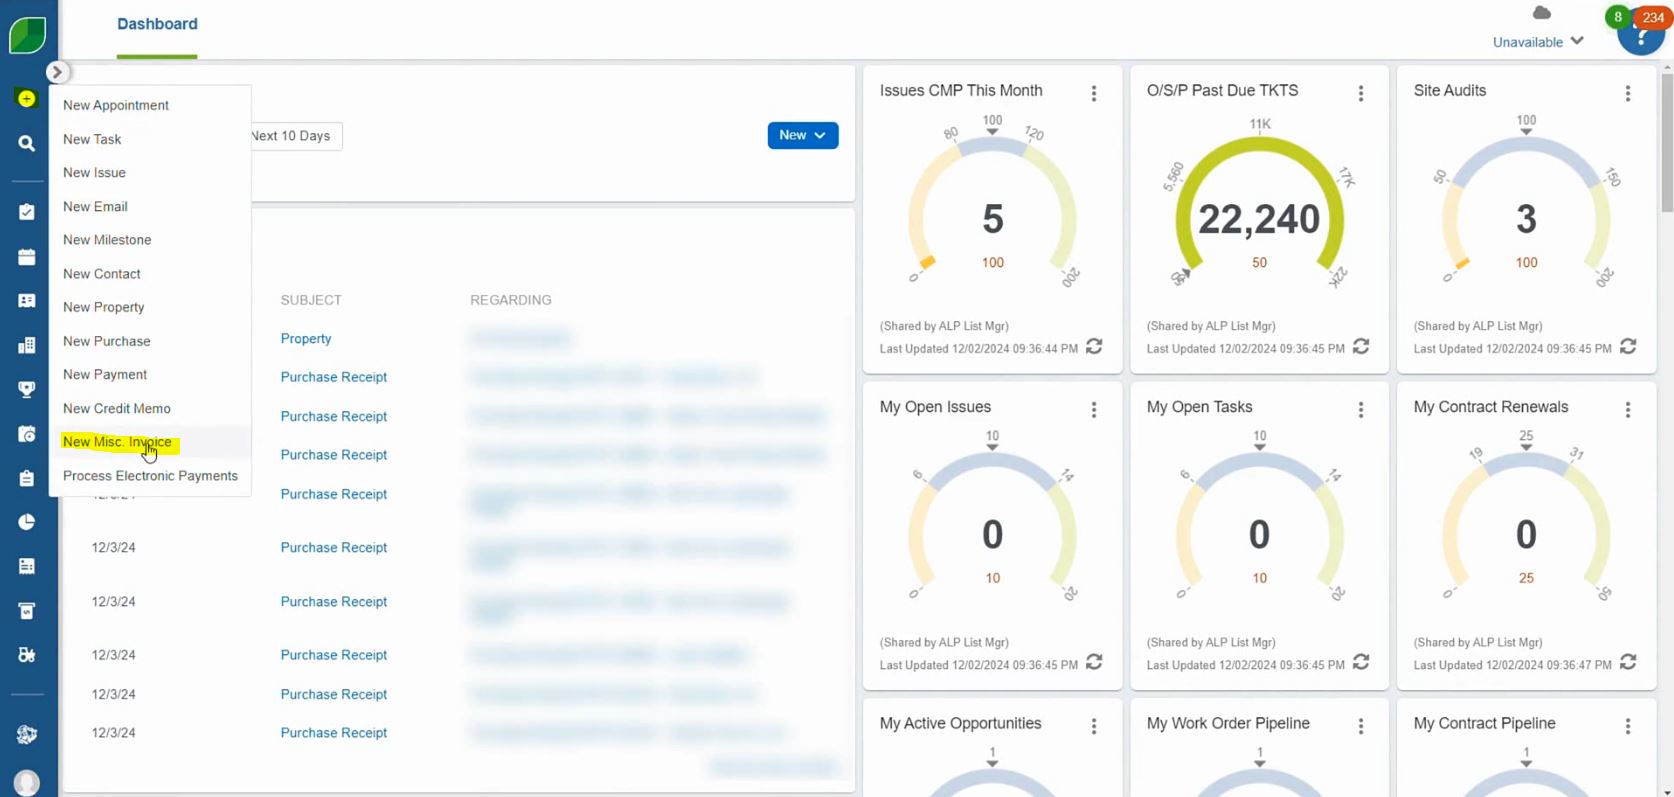
1. Click on the ‘+’ Sign and Select New Miscellaneous Invoice on Aspire

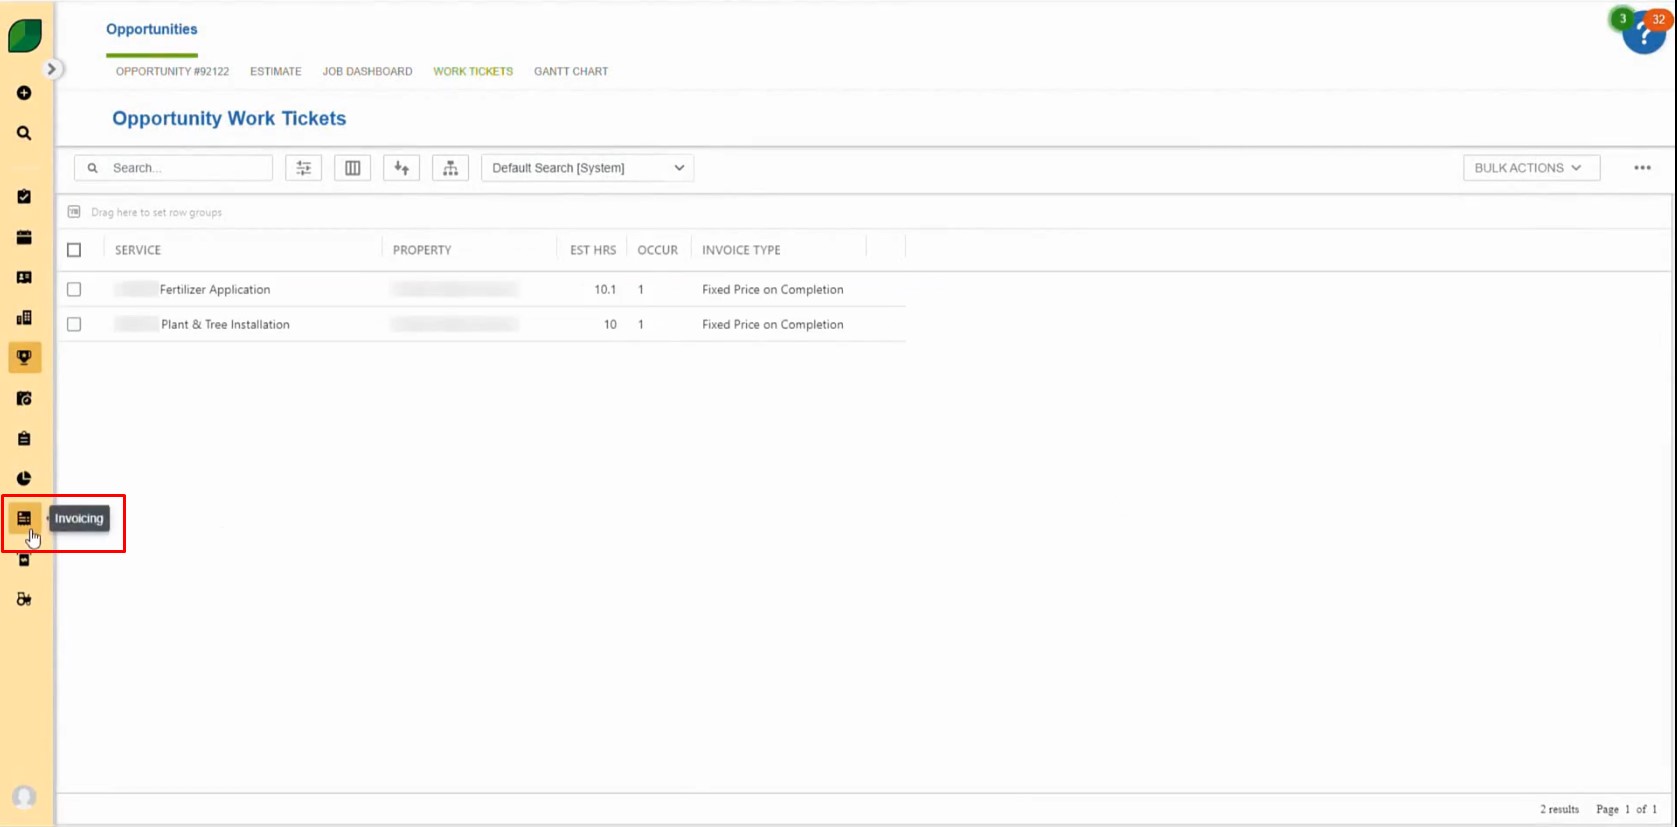
  • Begin by navigating to Aspire and clicking on the ‘+’ sign to start the invoice creation process.
  • From the menu, choose the option to create a new miscellaneous invoice.

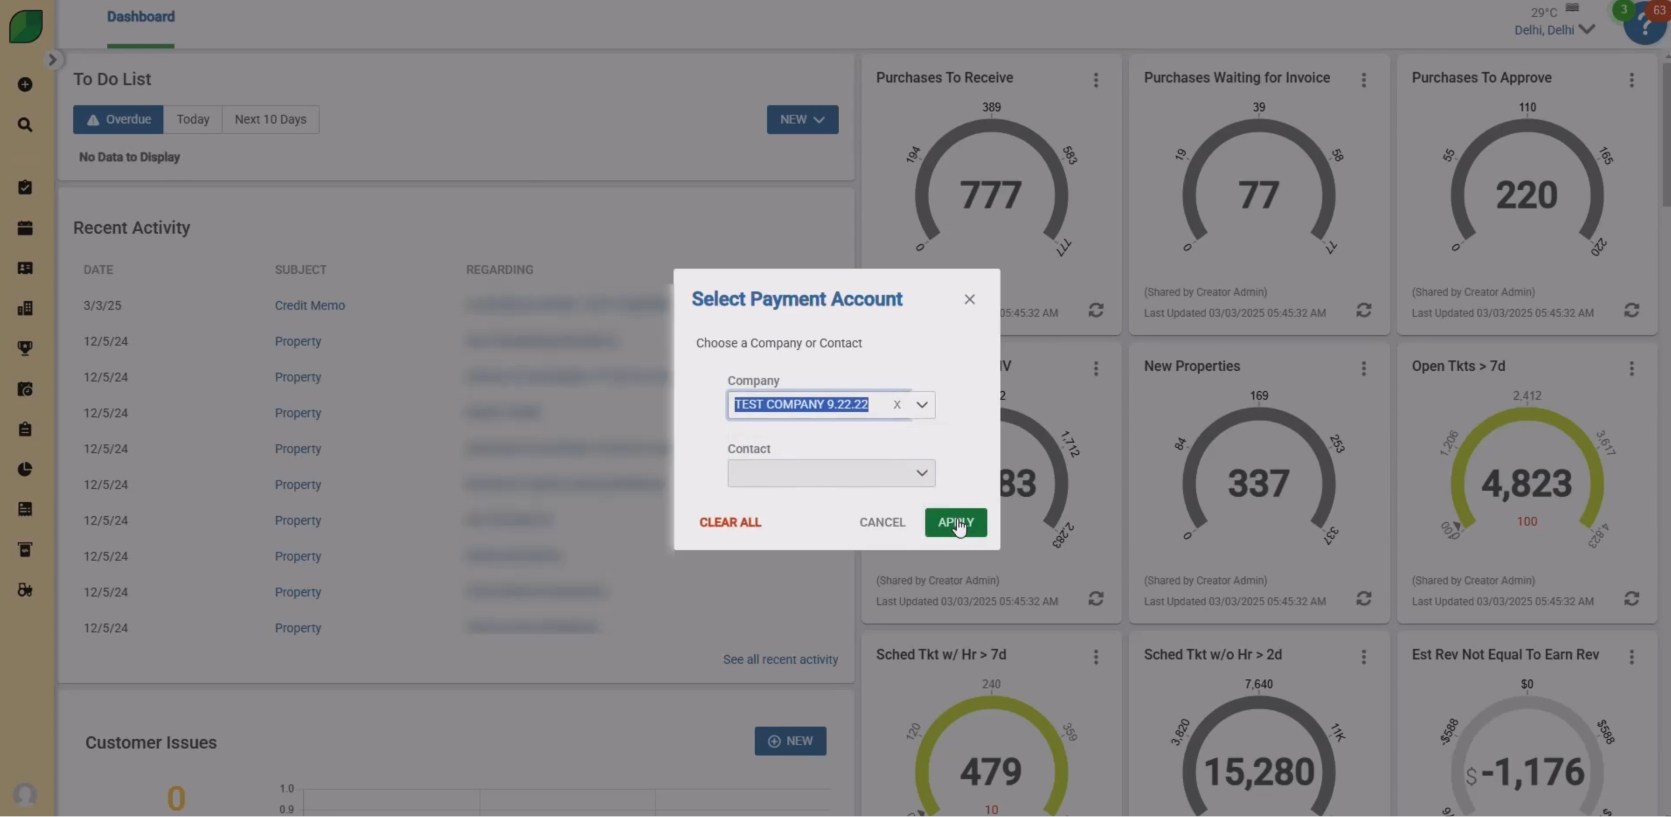
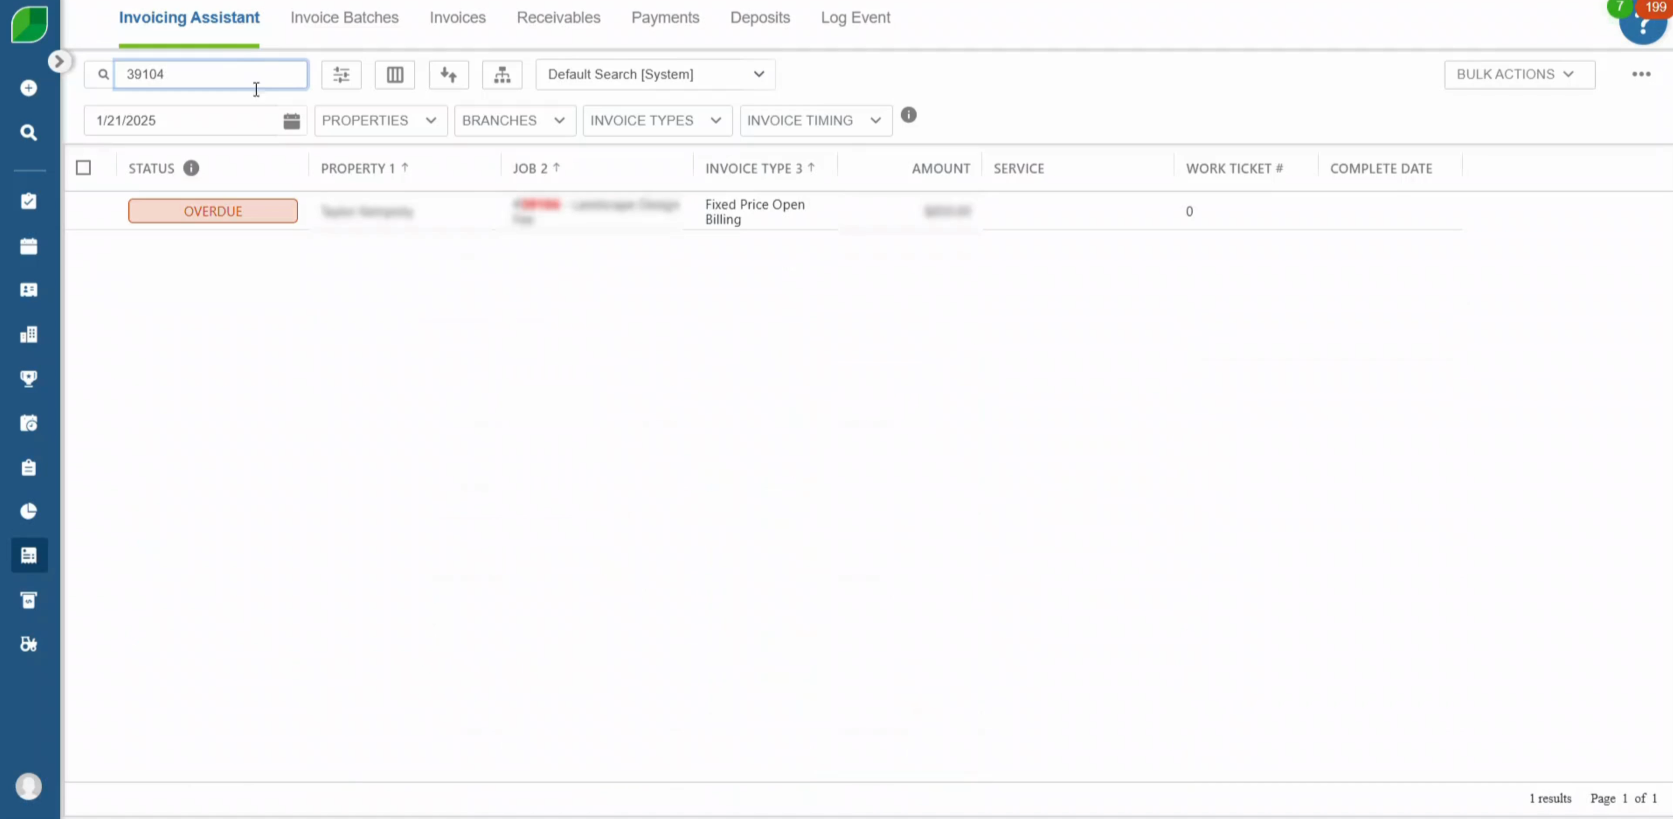
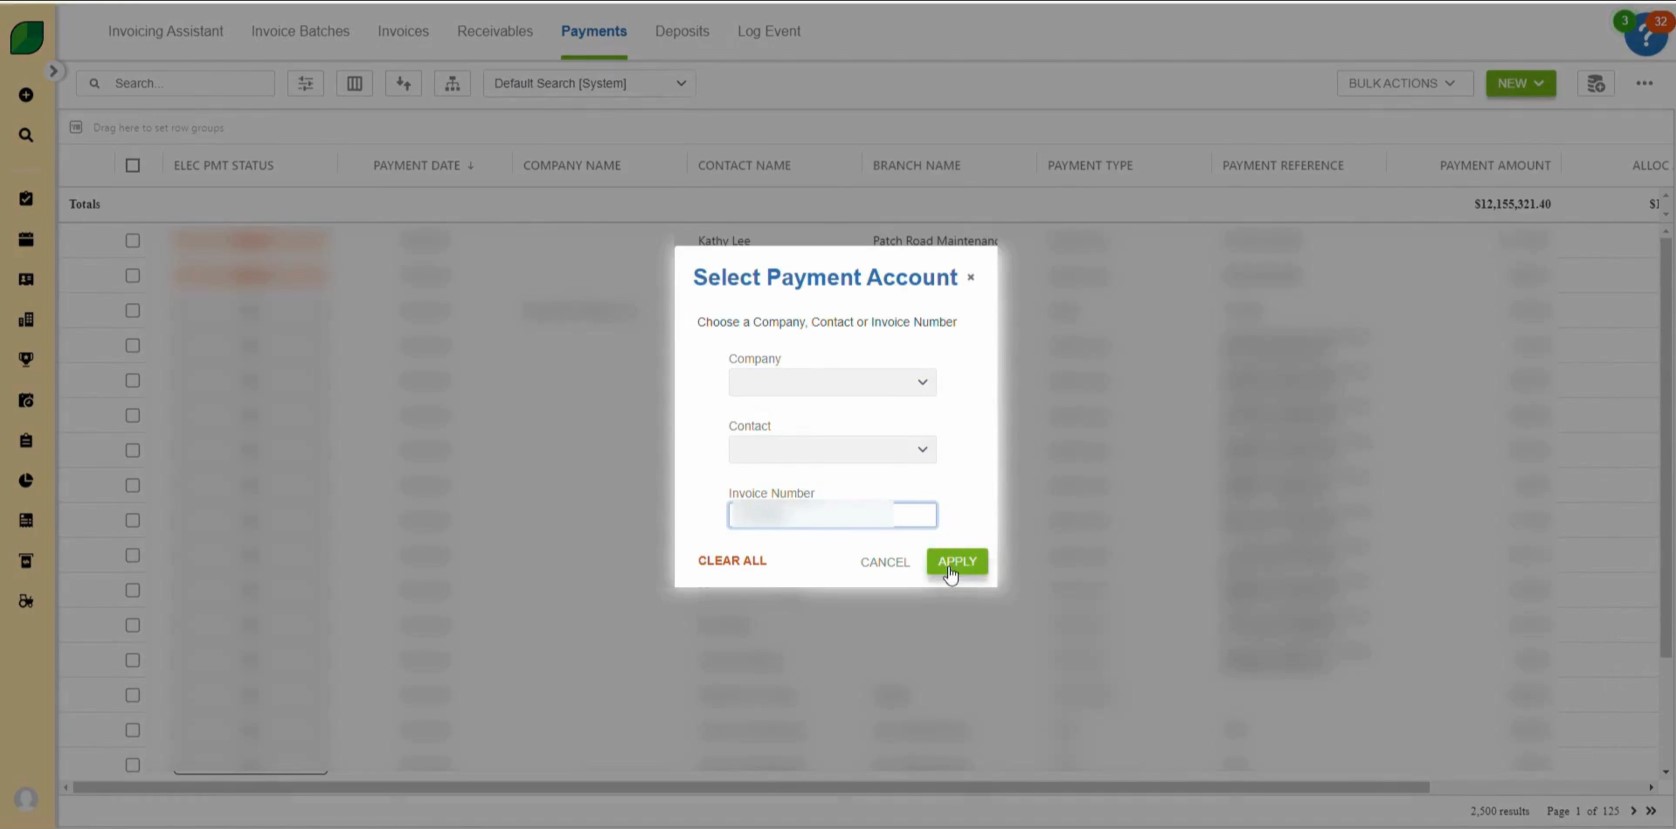
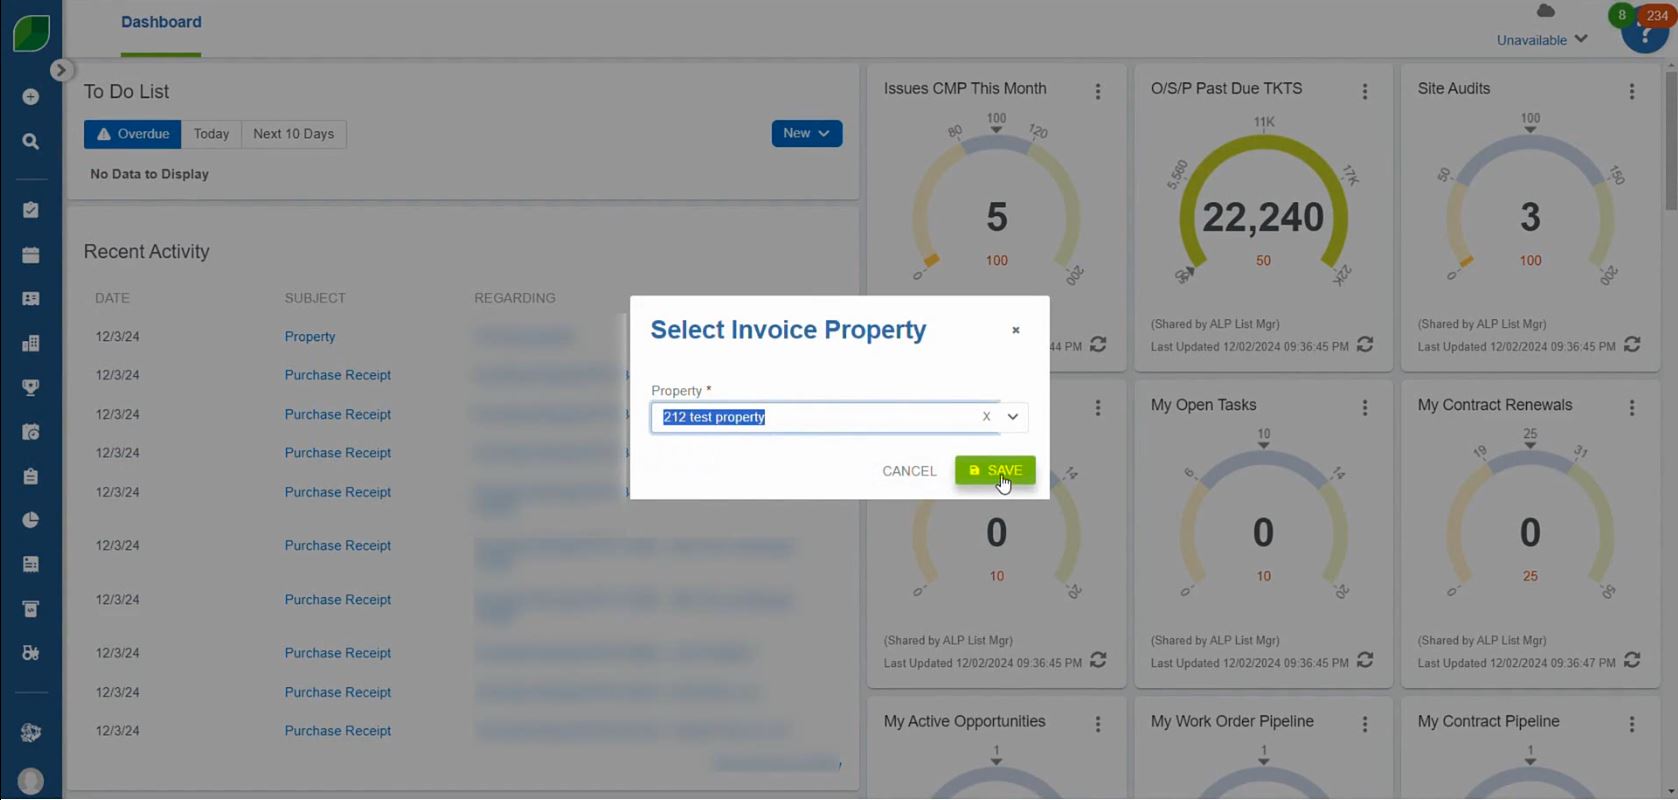
2. Select the Property Invoice Name

  • Input the name of the property associated with this transaction.
  • Click on Save.

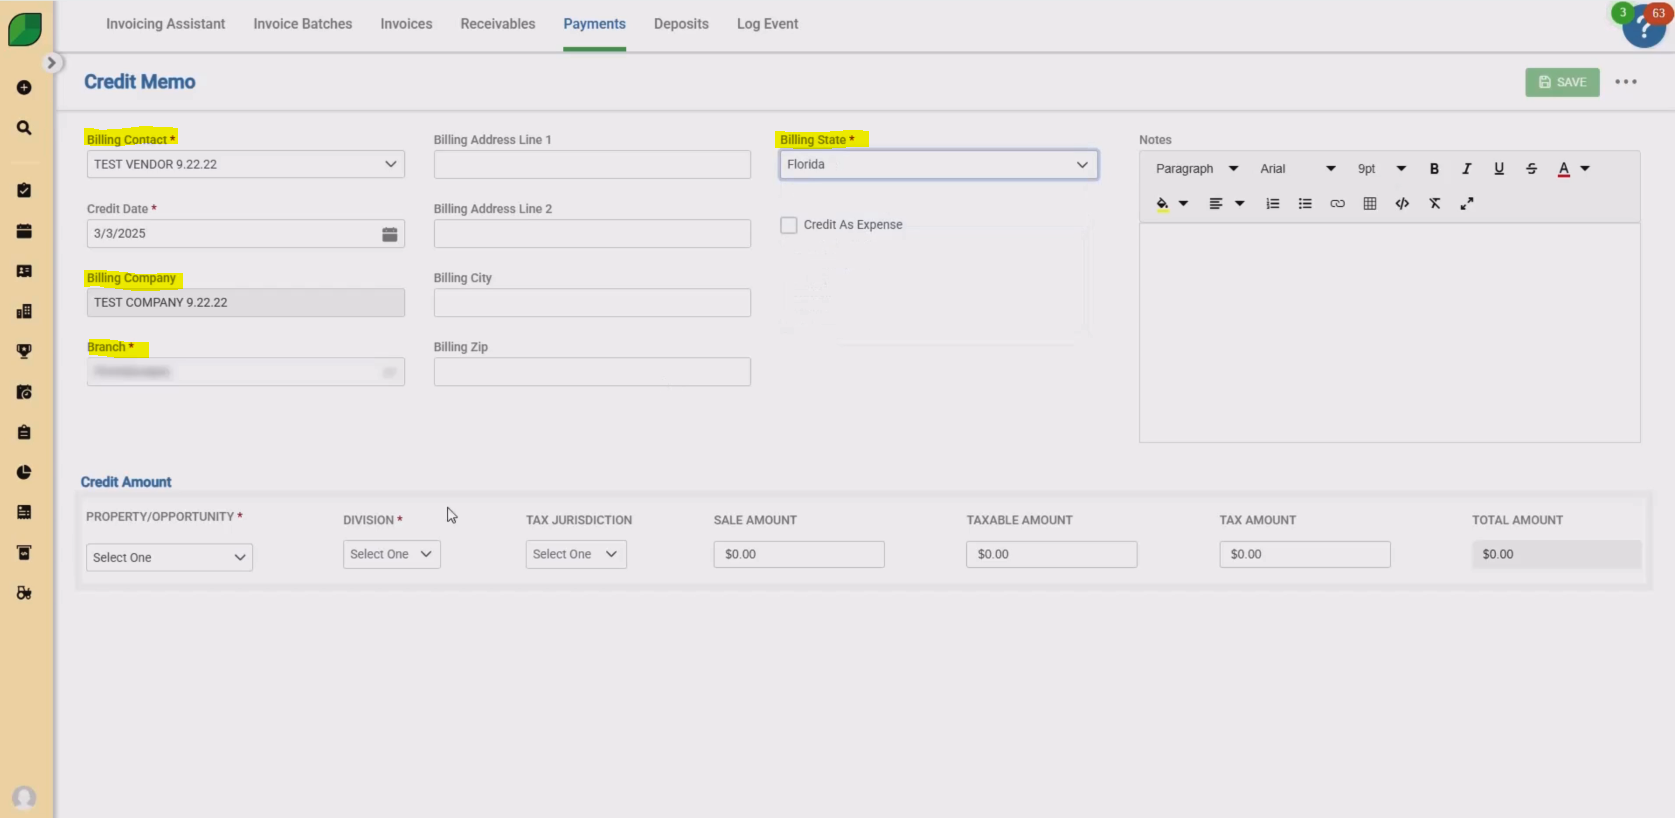
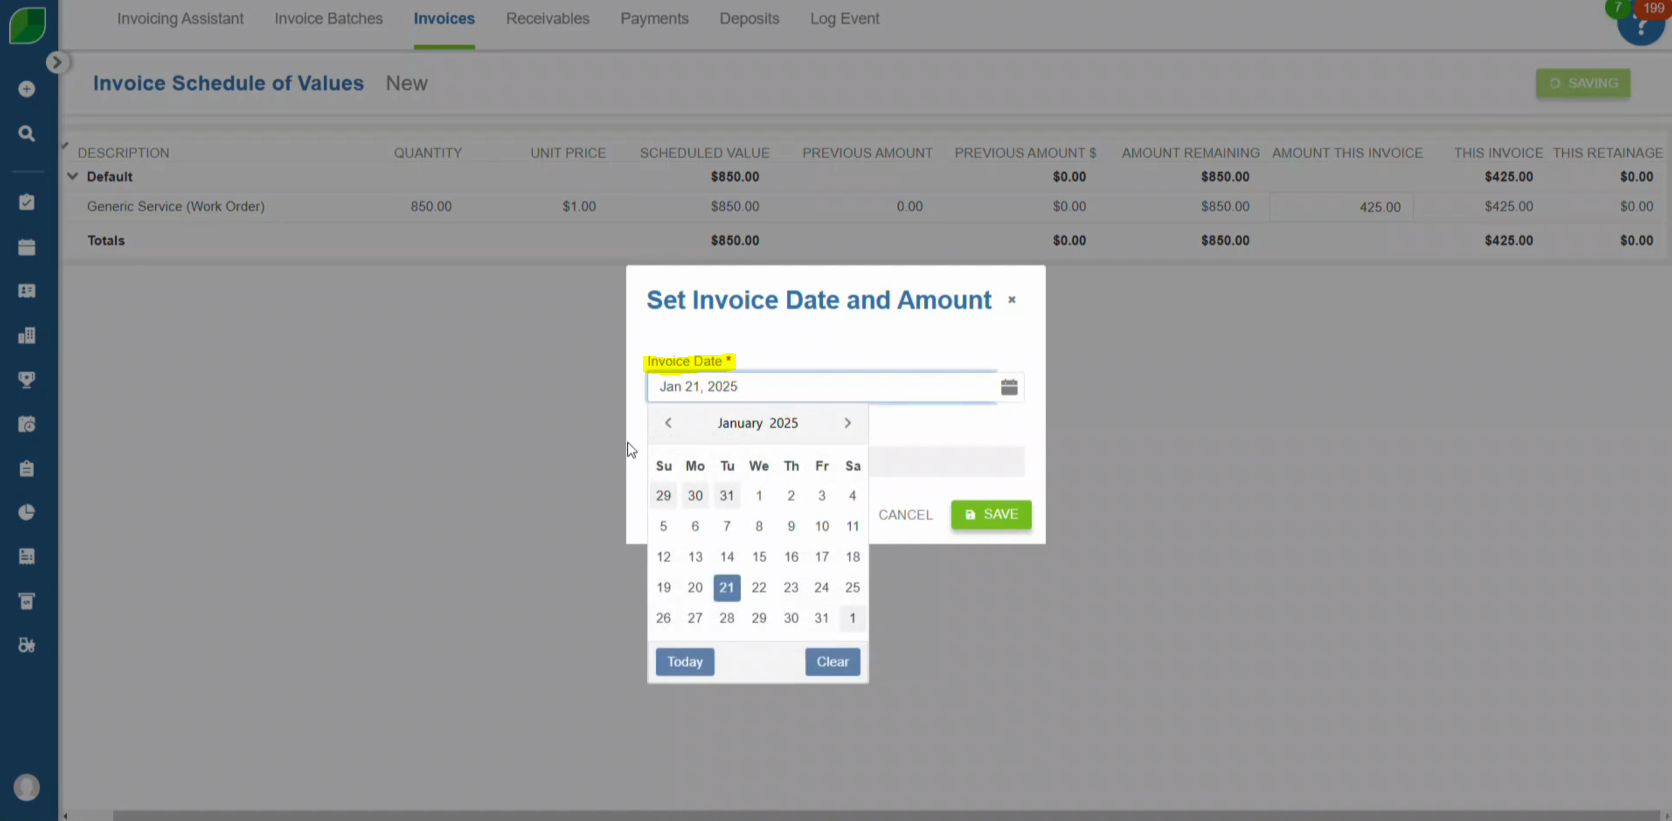
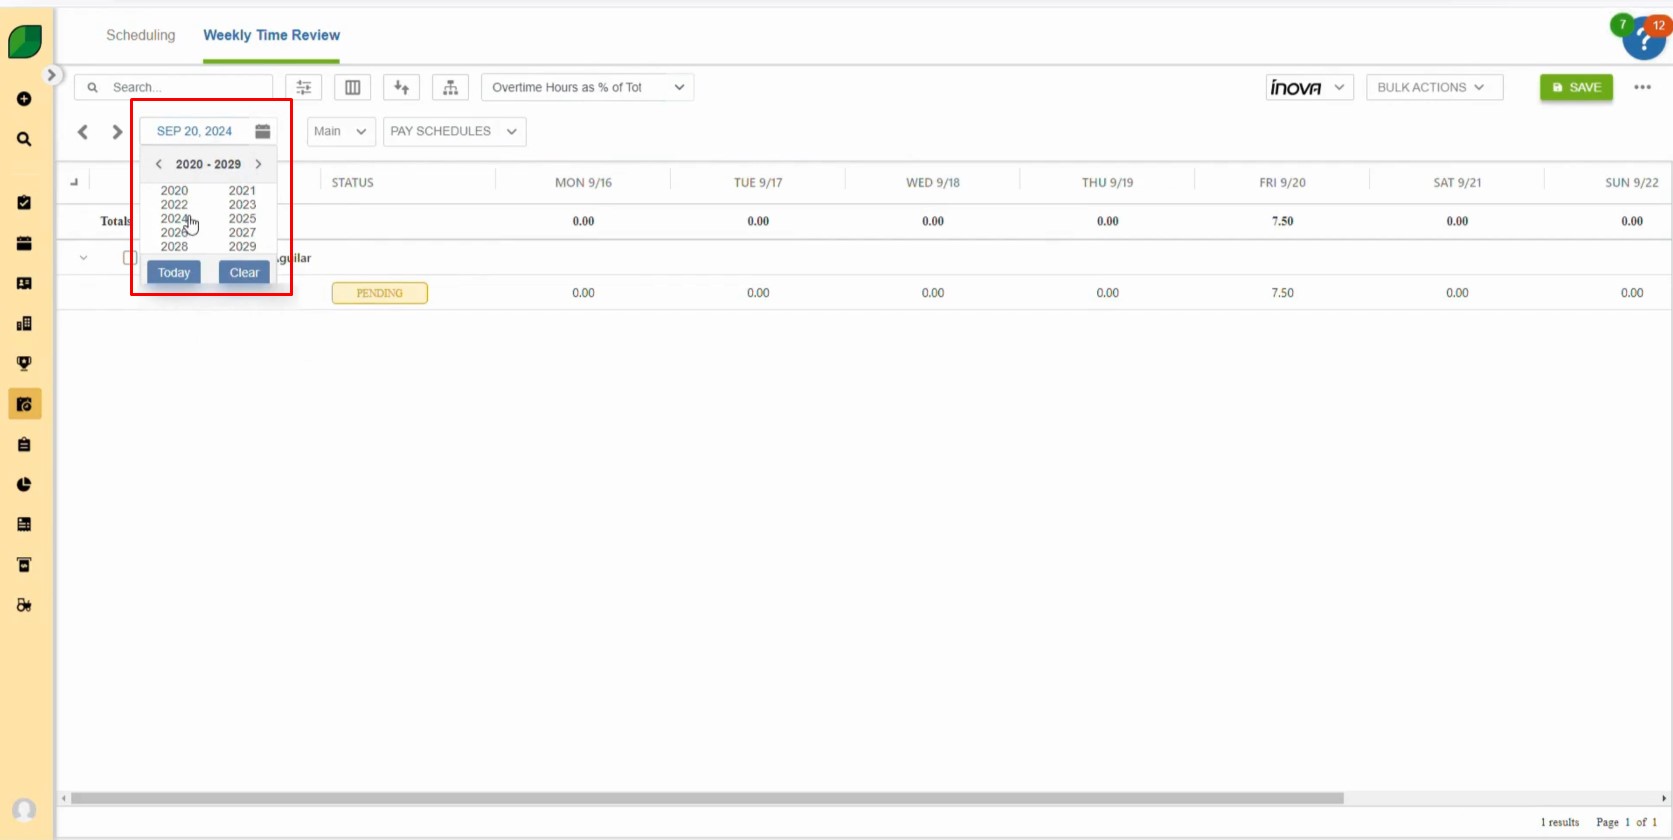
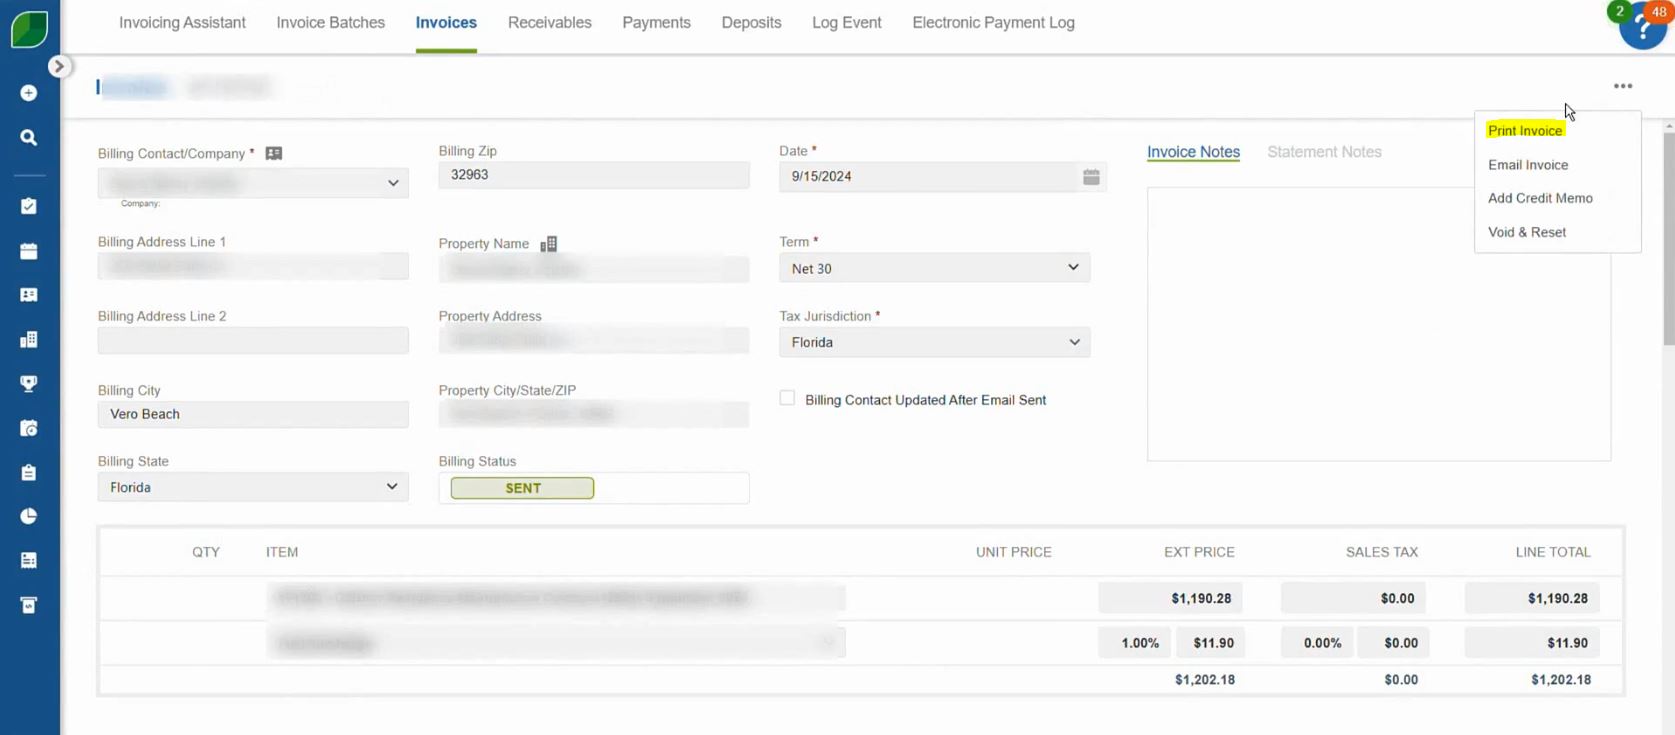
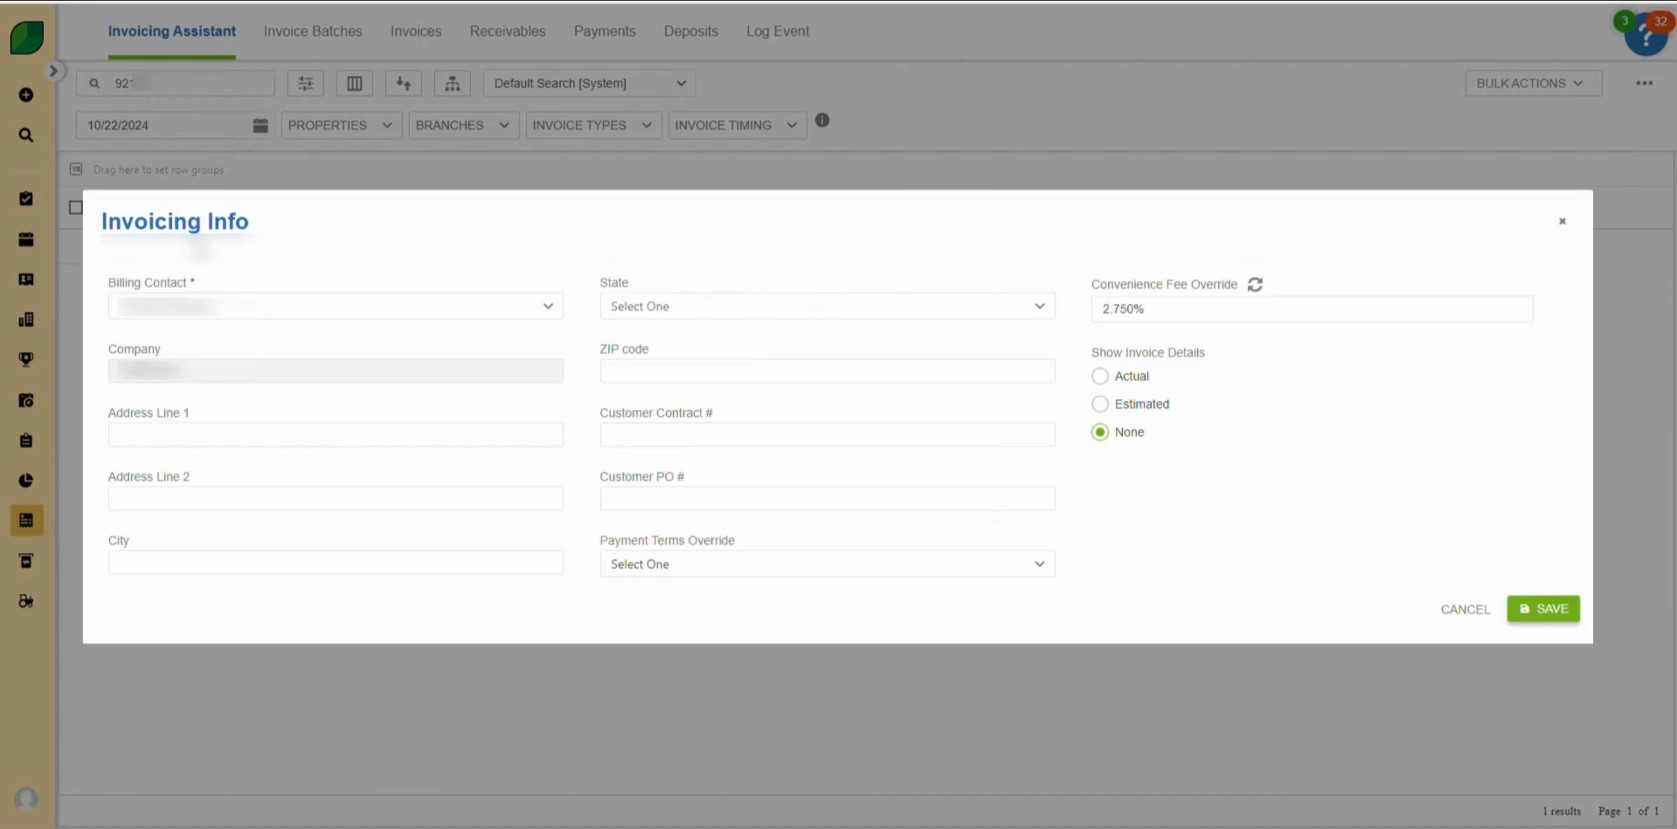
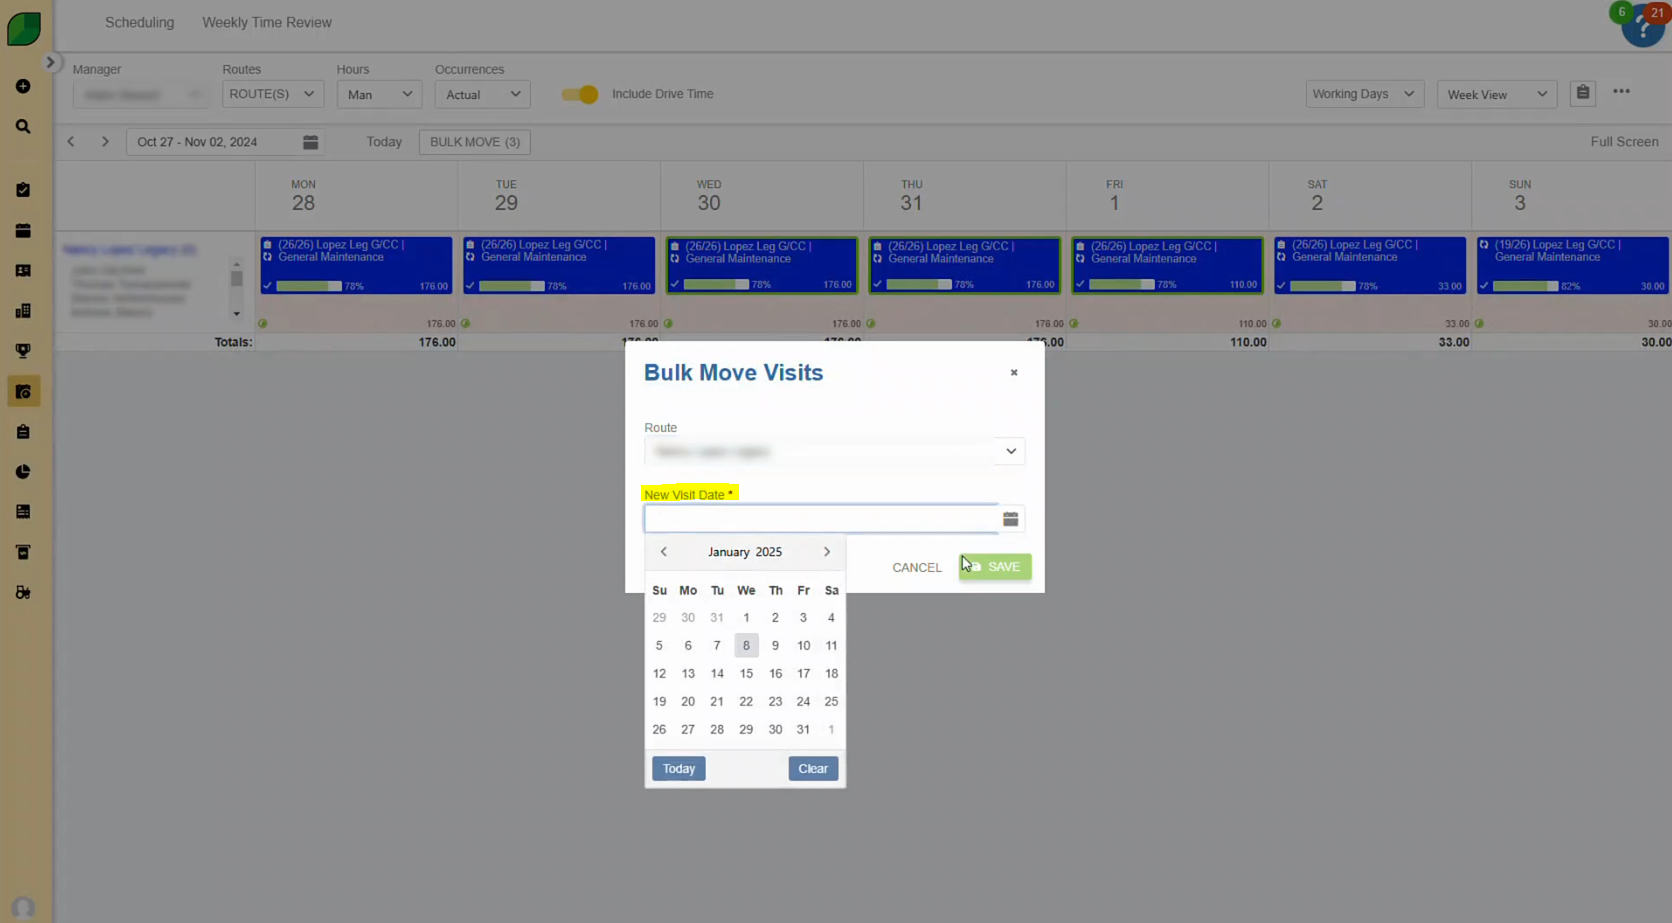
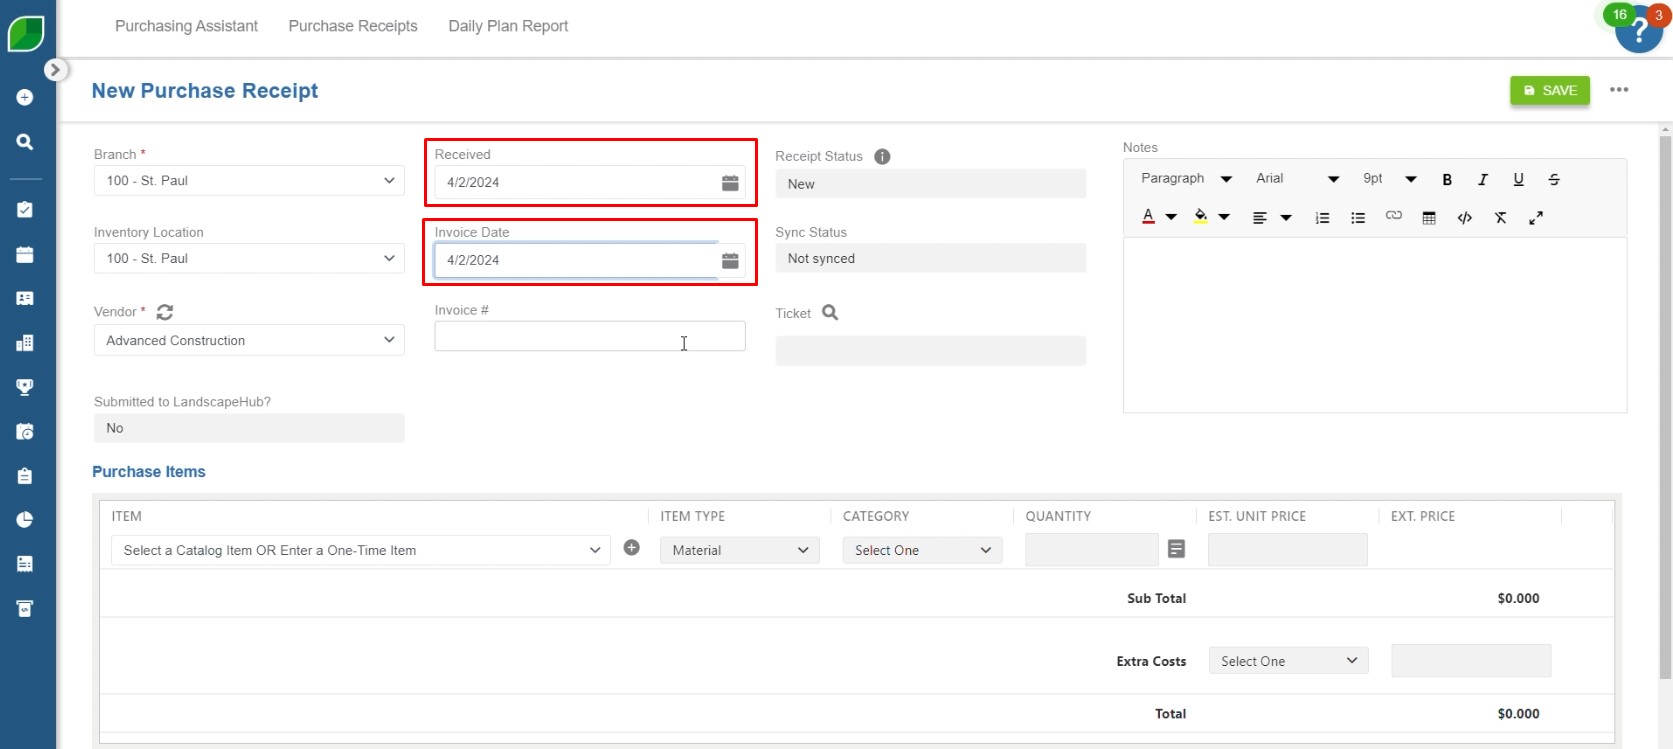
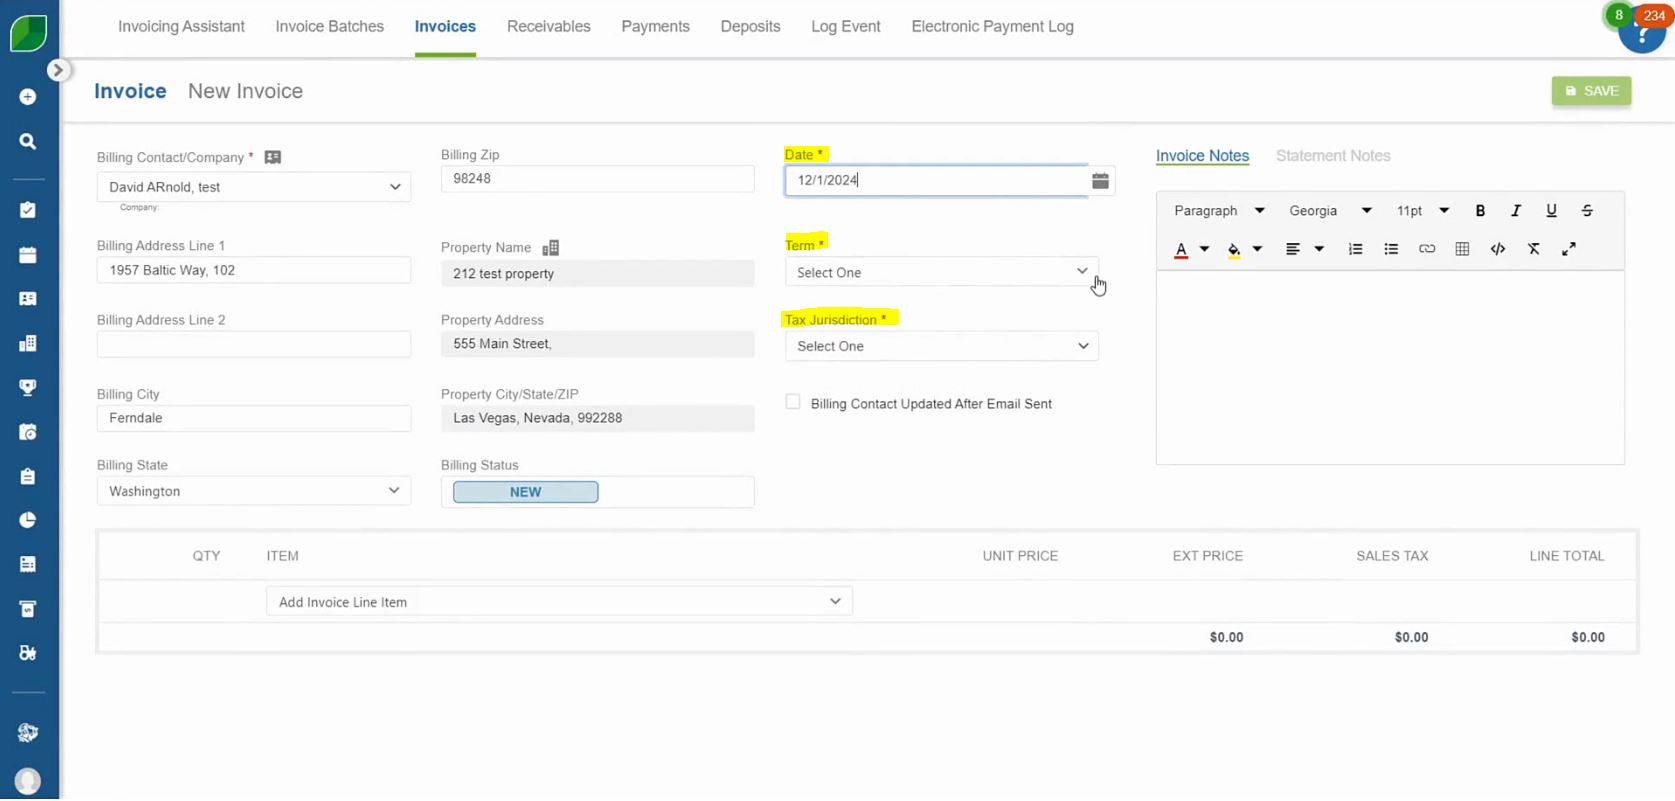
3. Select the Date and Tax Jurisdiction

  • Select the date of the transaction.
  • Select “Term”.
  • Then select the appropriate tax jurisdiction.

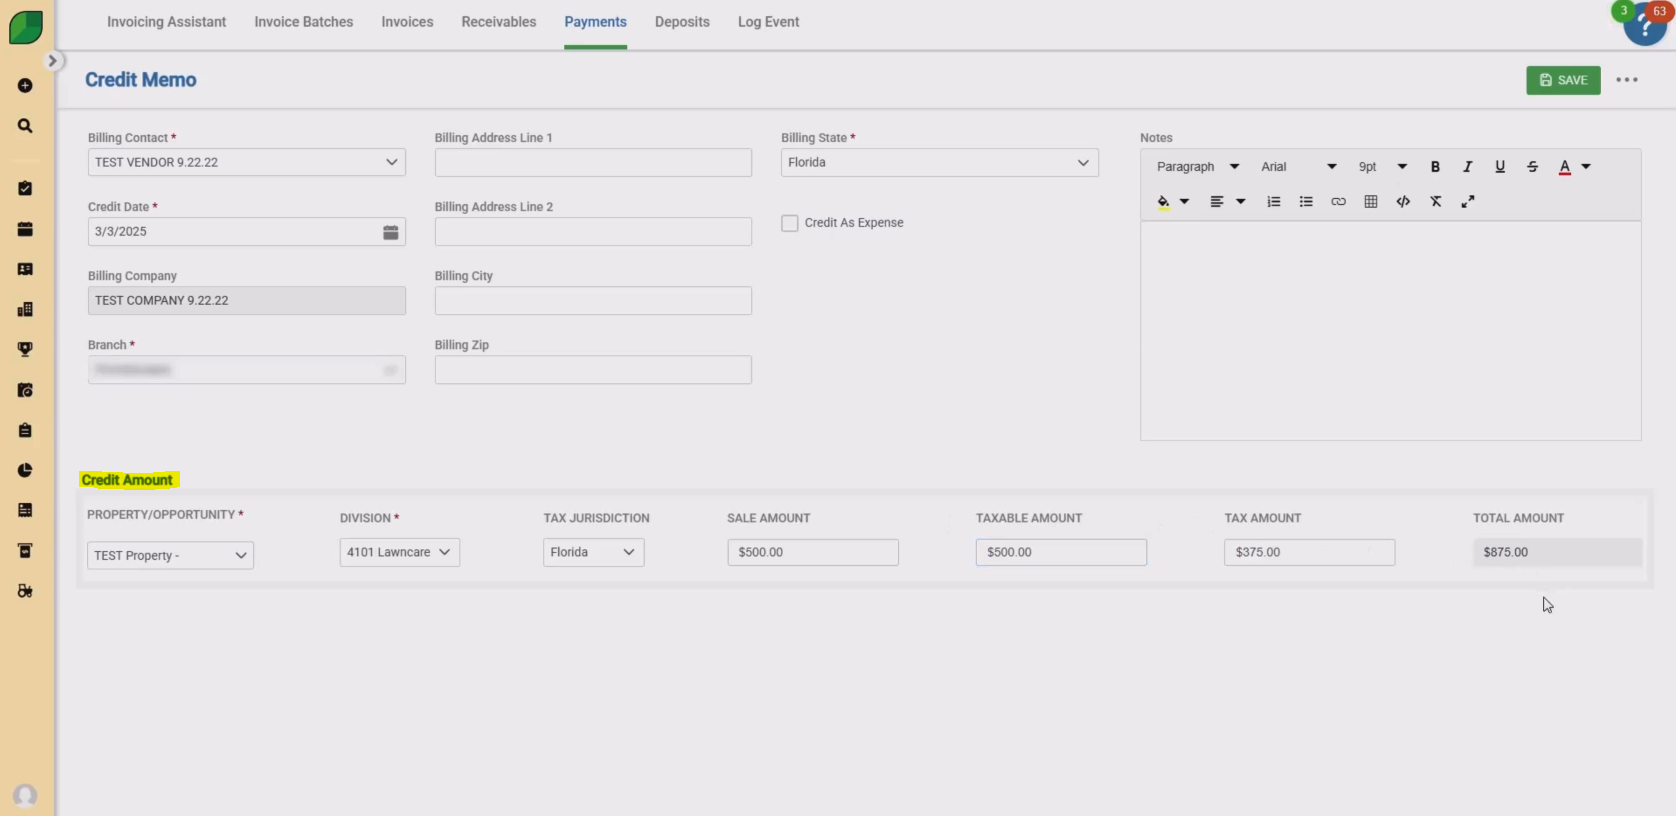
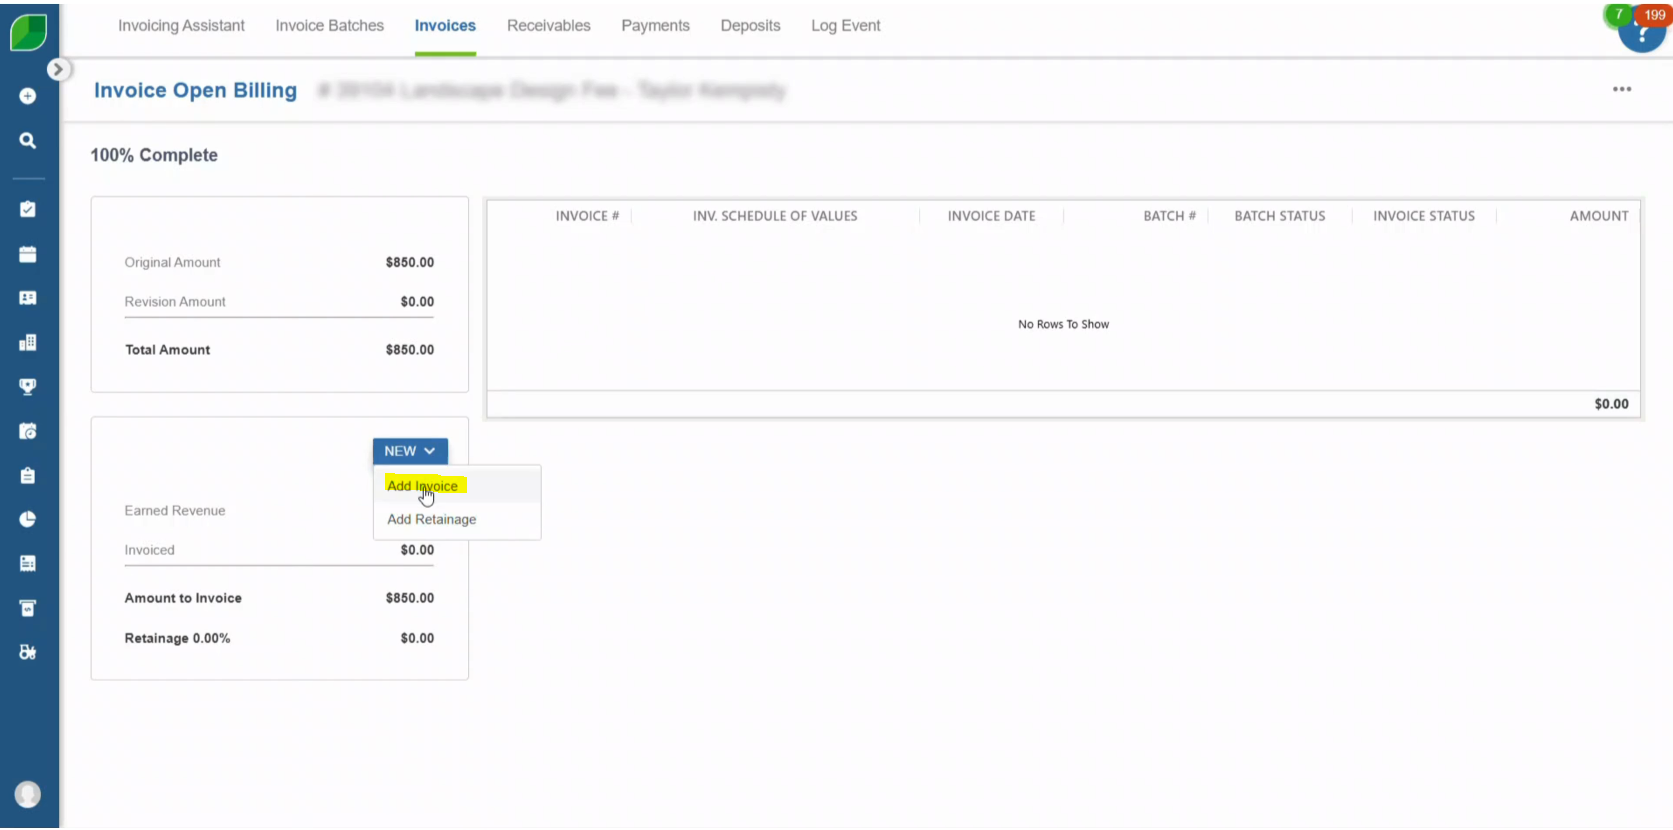
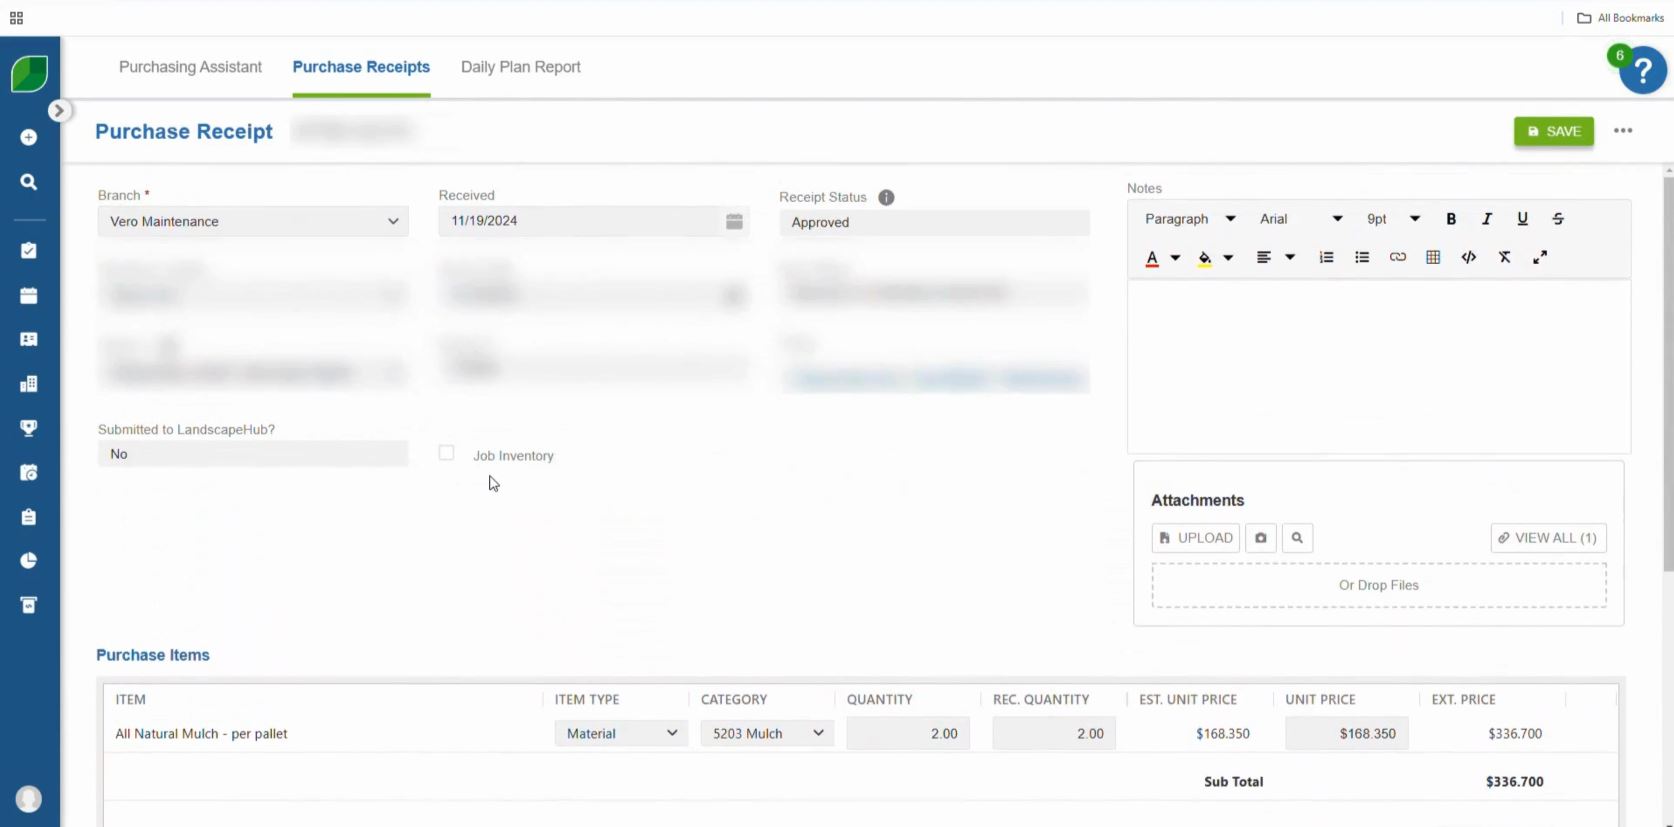
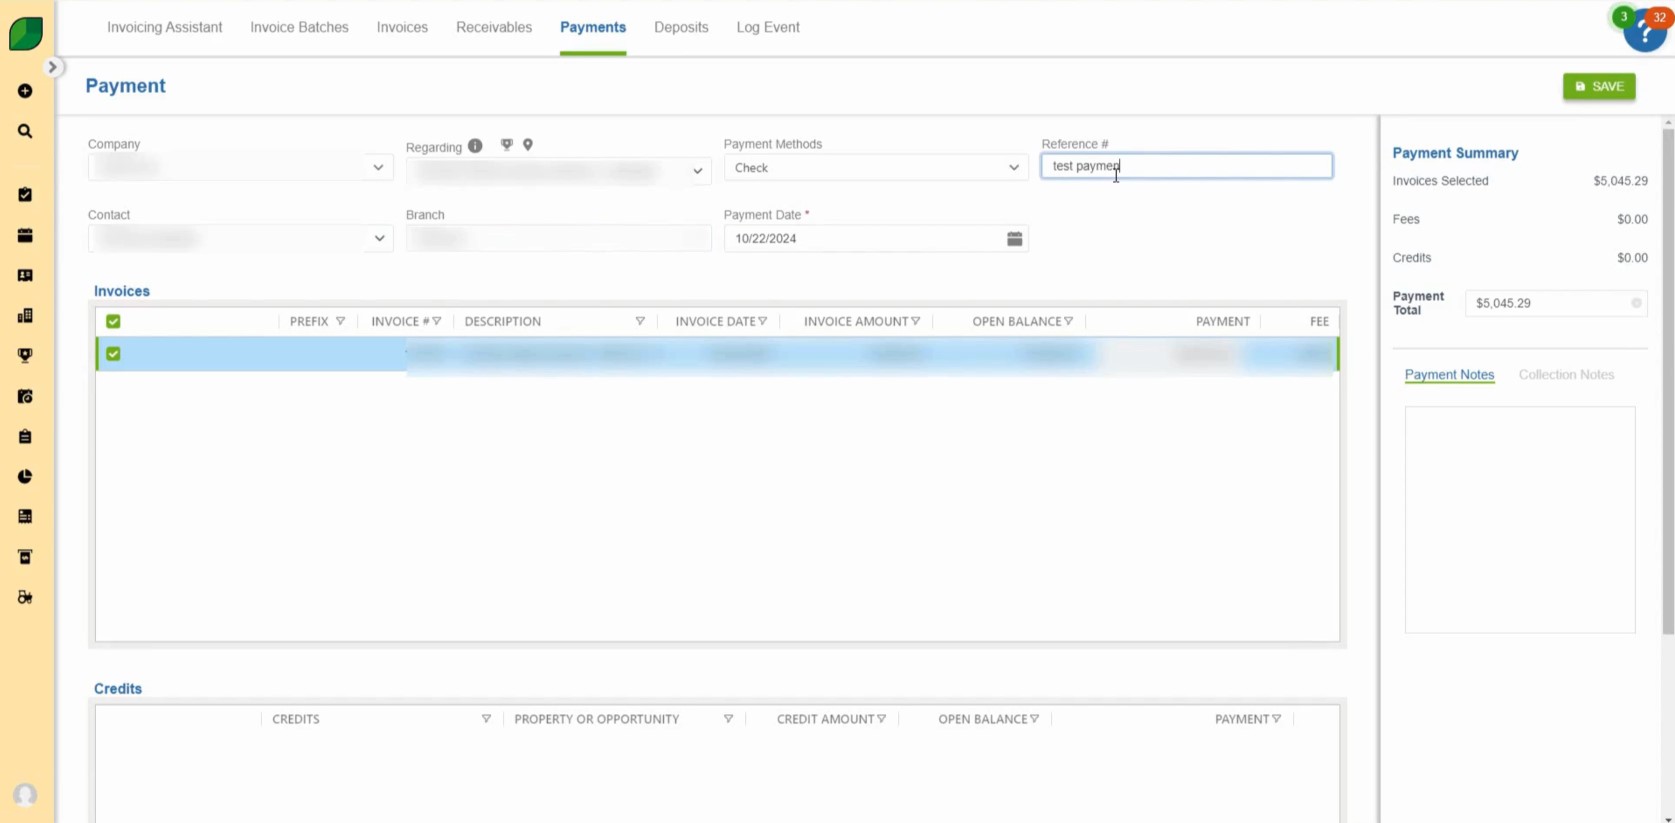
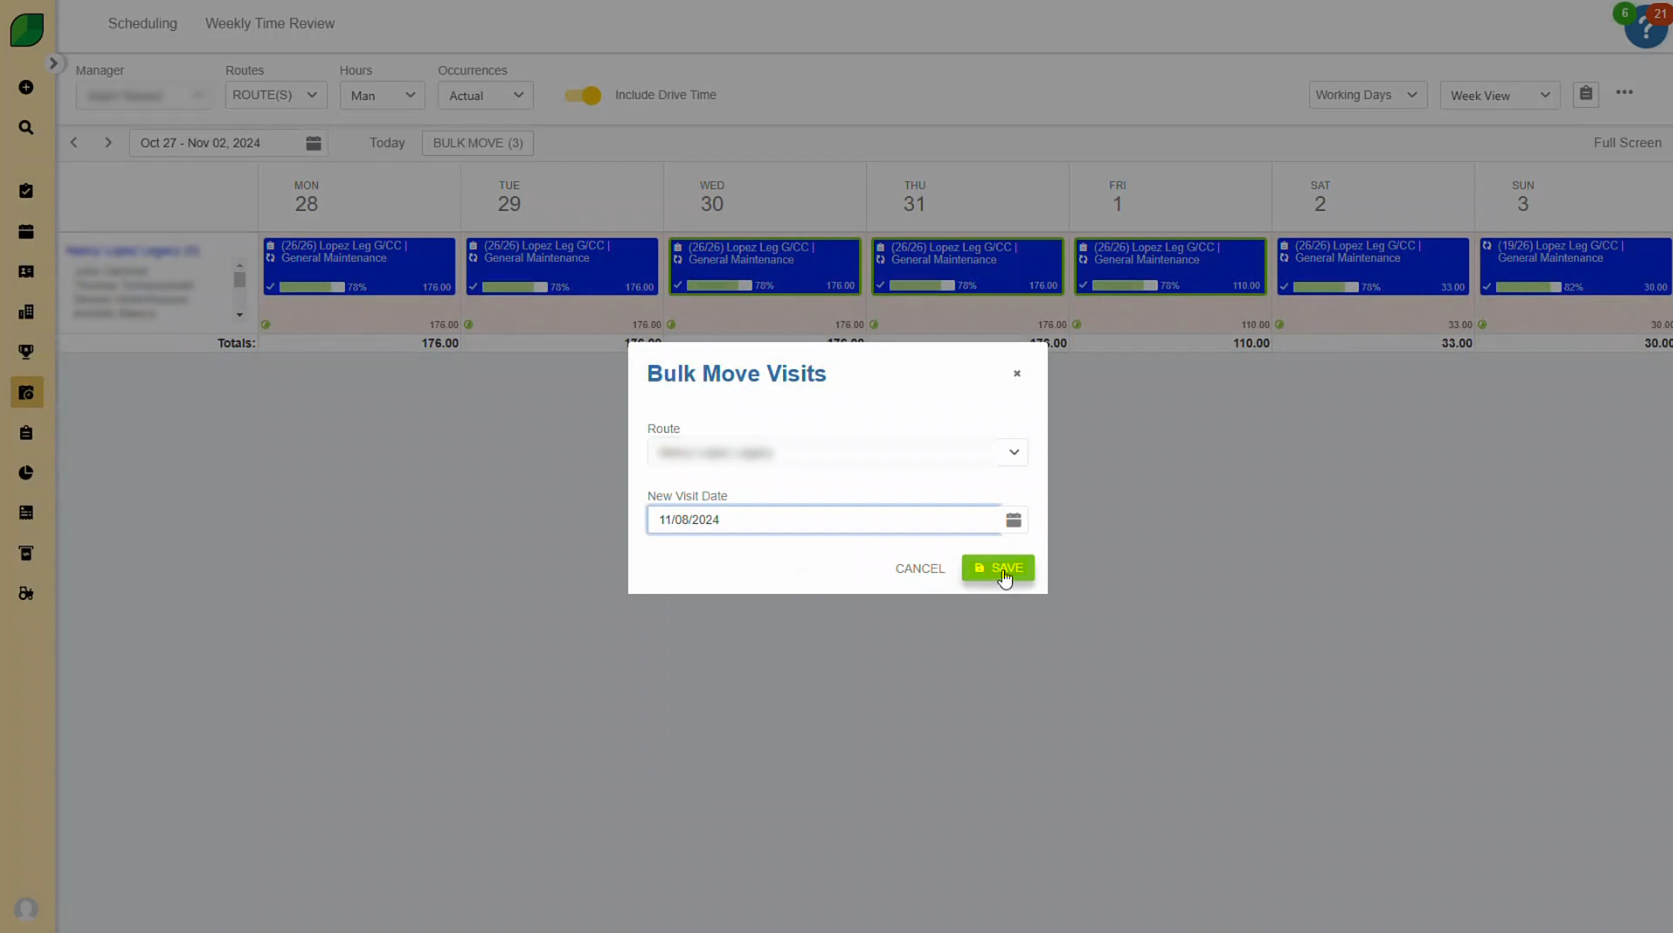
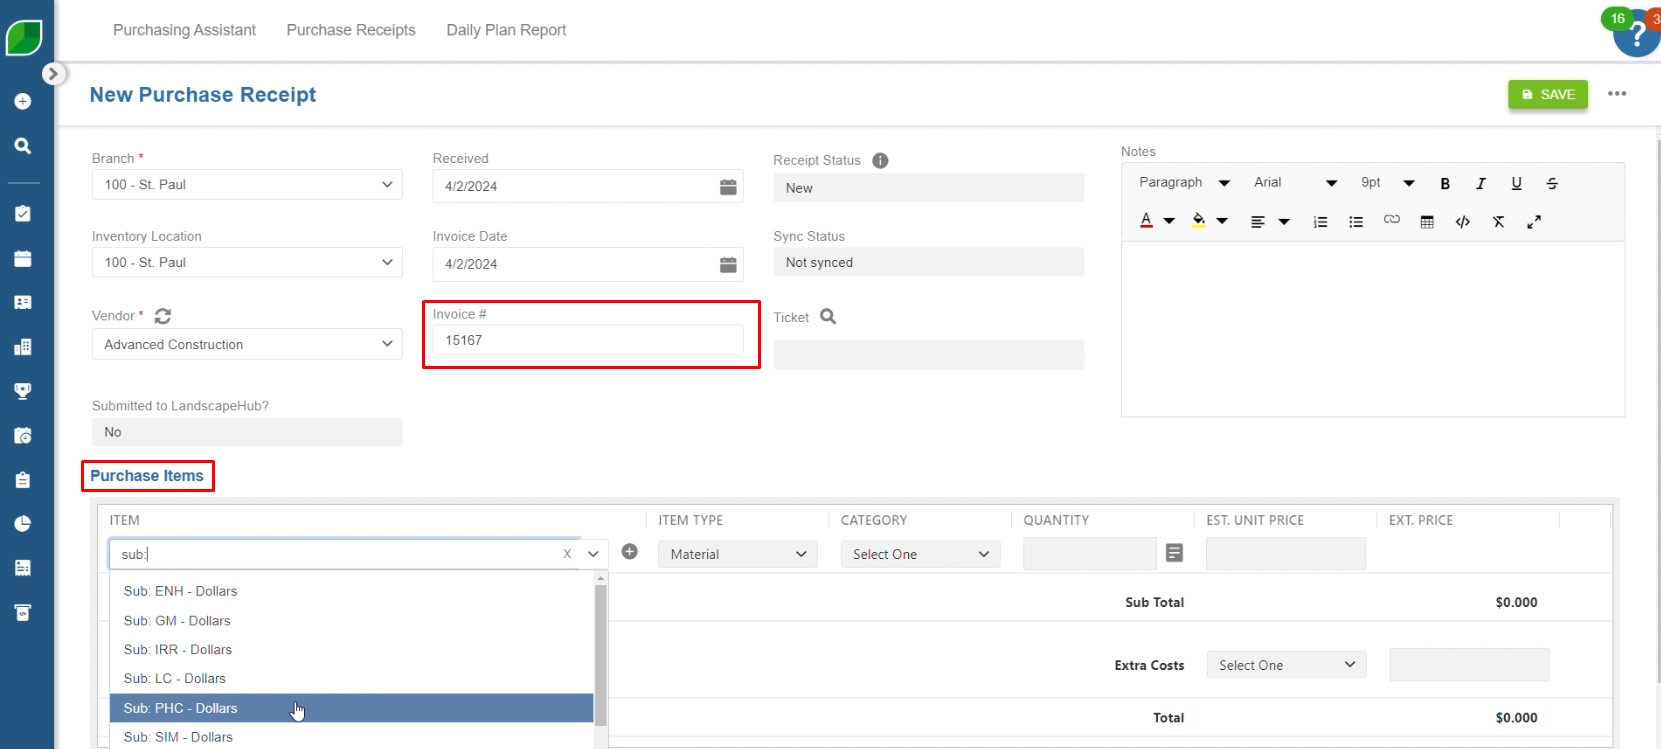
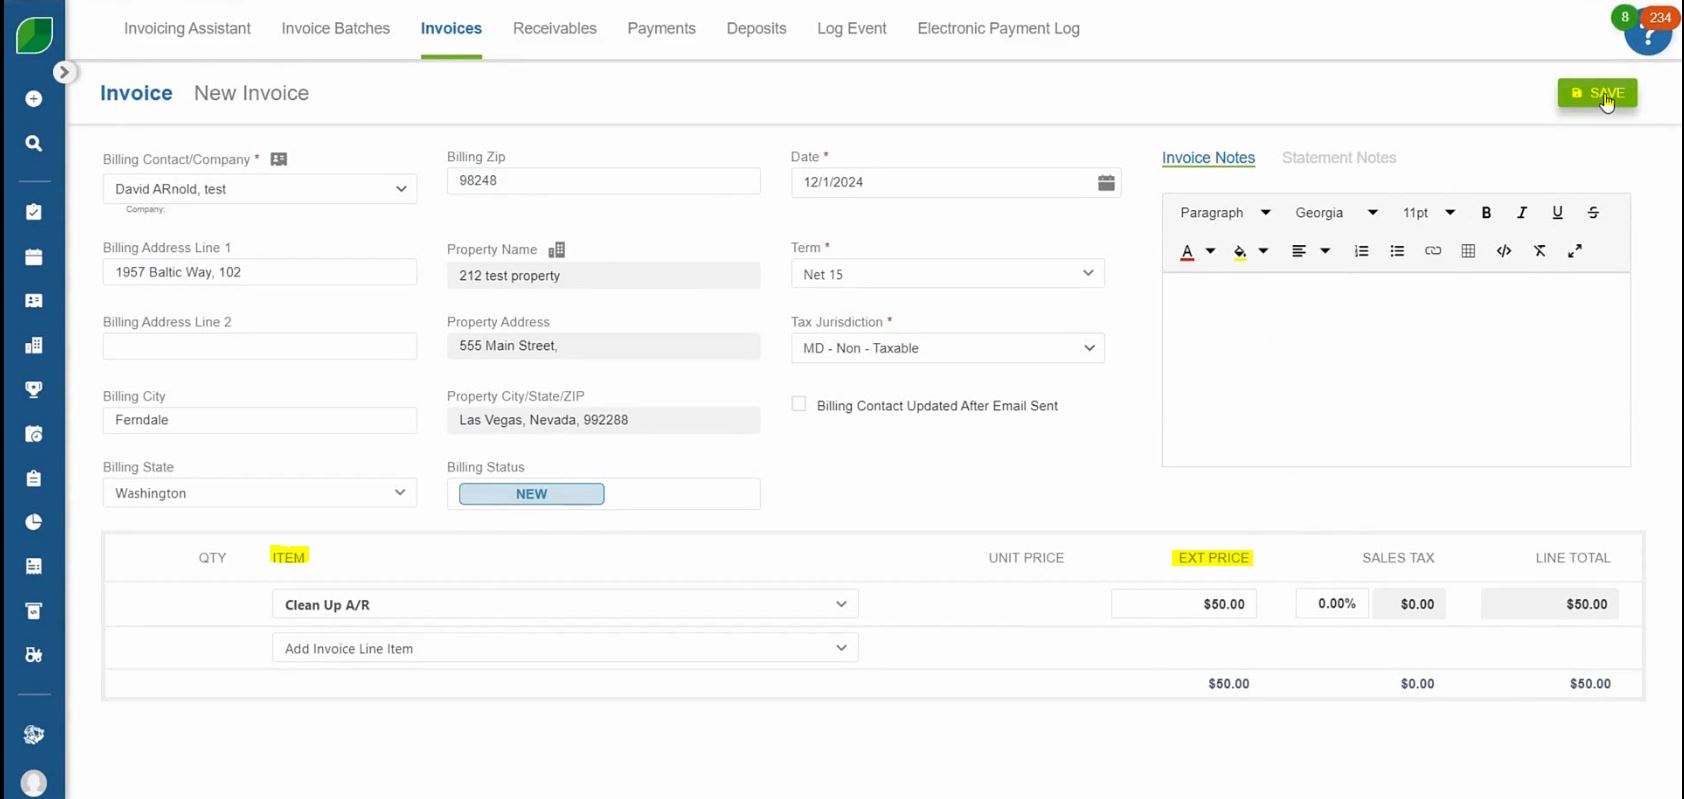
4. Go to ‘Item’ and Select ‘Add Invoice Line Item’

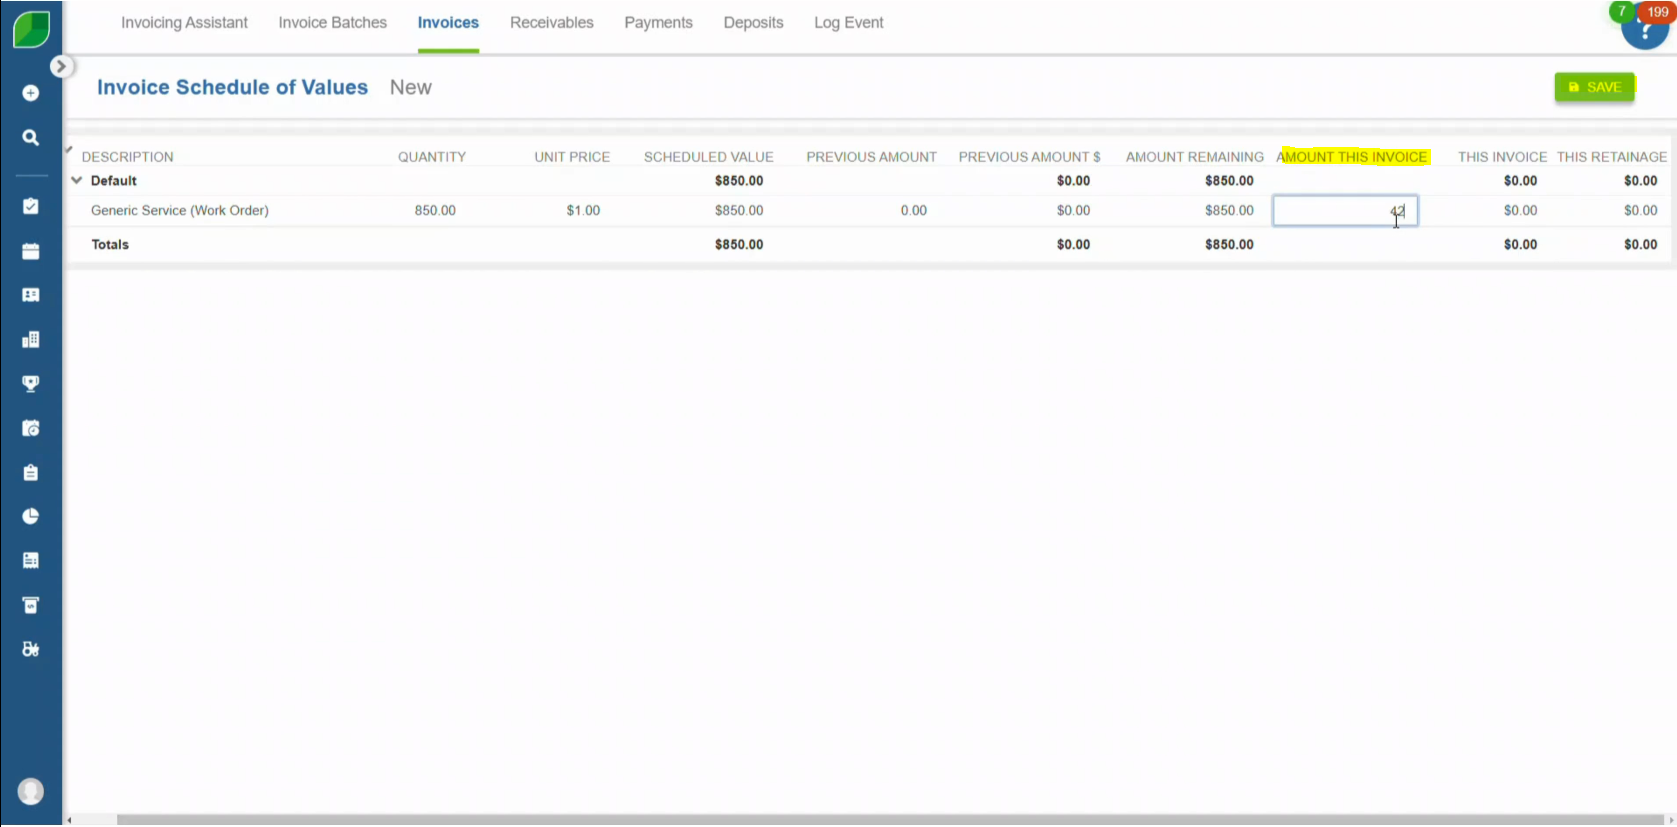
  • Navigate to the ‘Item’ section, select ‘Add Invoice Line Item,’ and enter the ‘EXT. Price’ for the transaction.
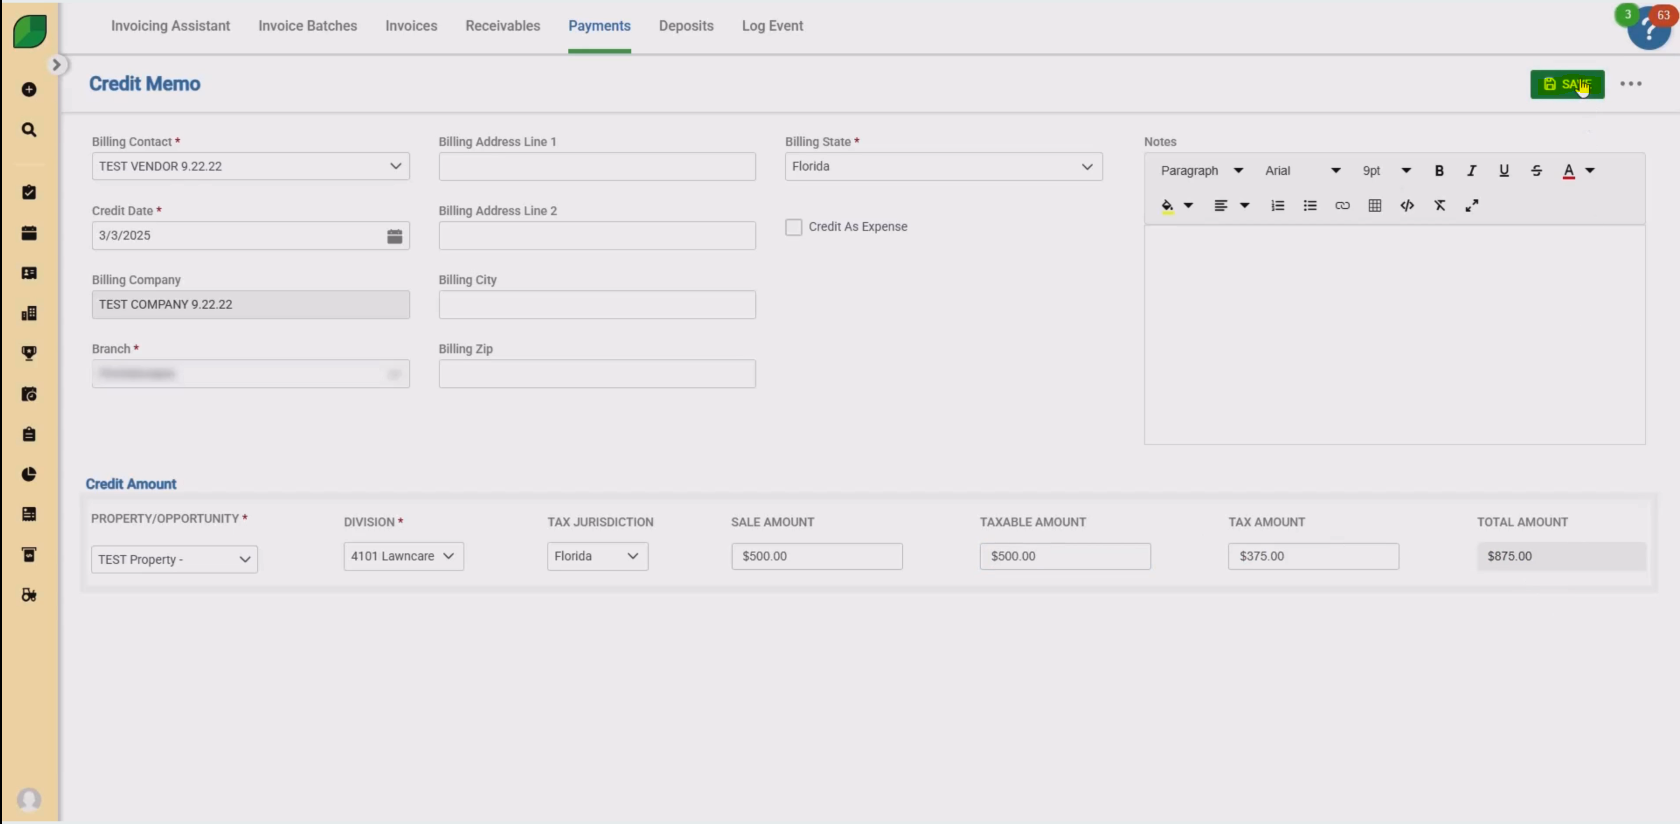
  • After entering the details for the line item, click ‘Save’ to confirm.

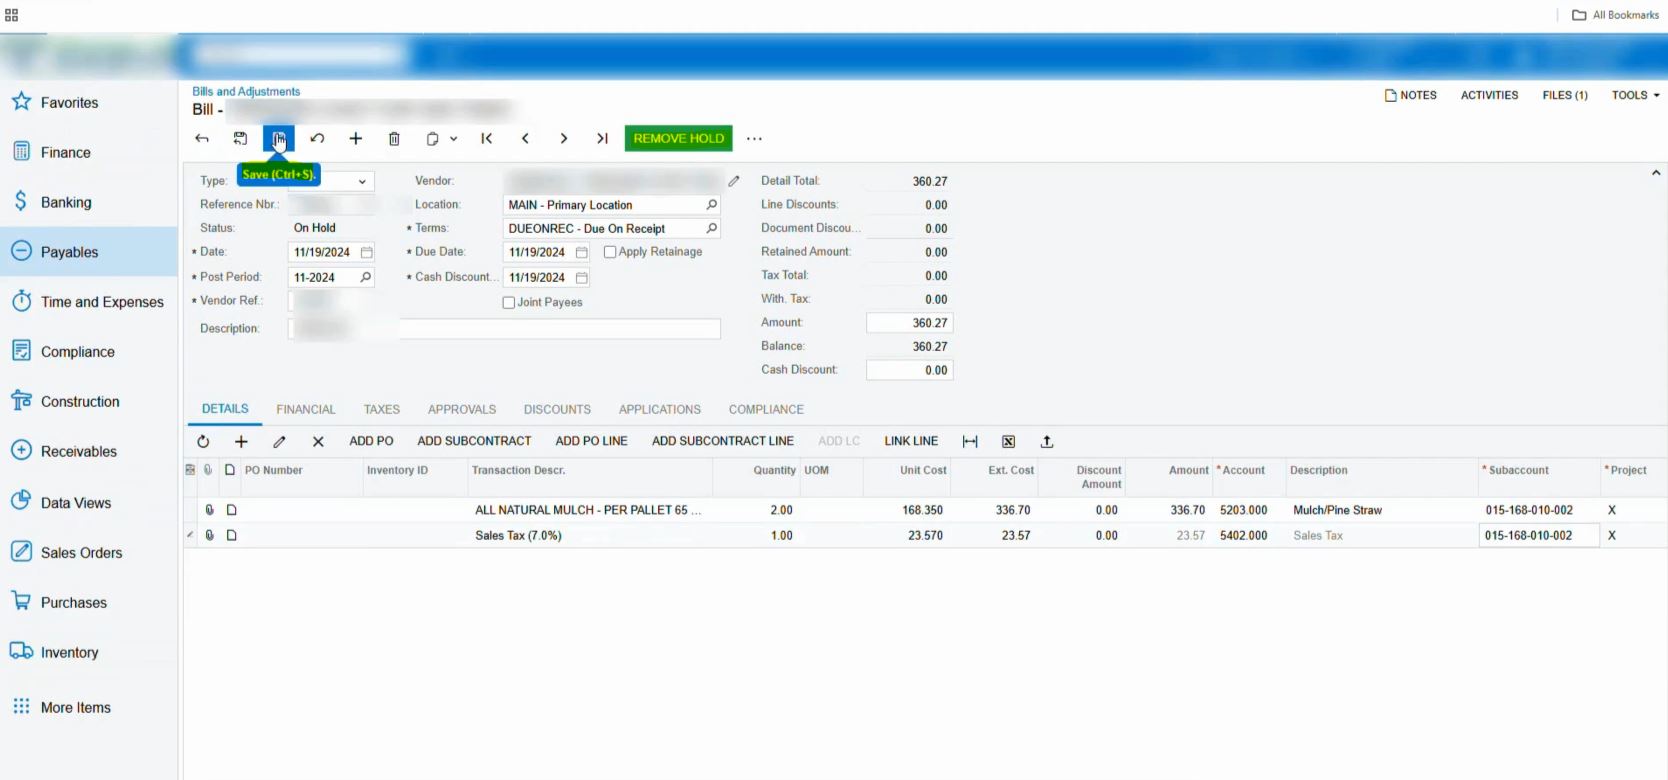
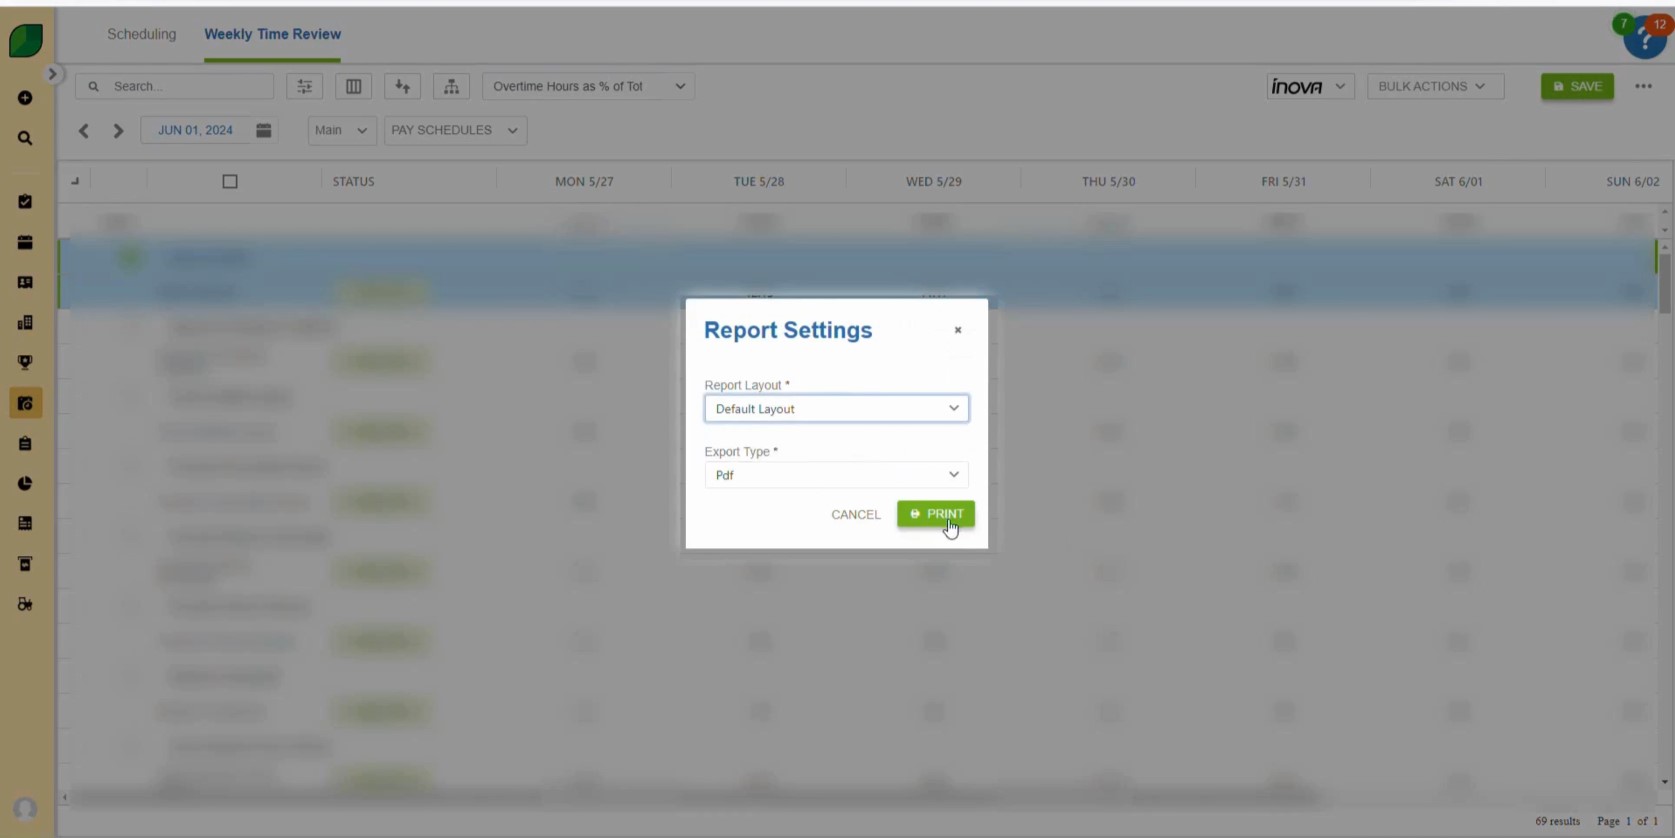
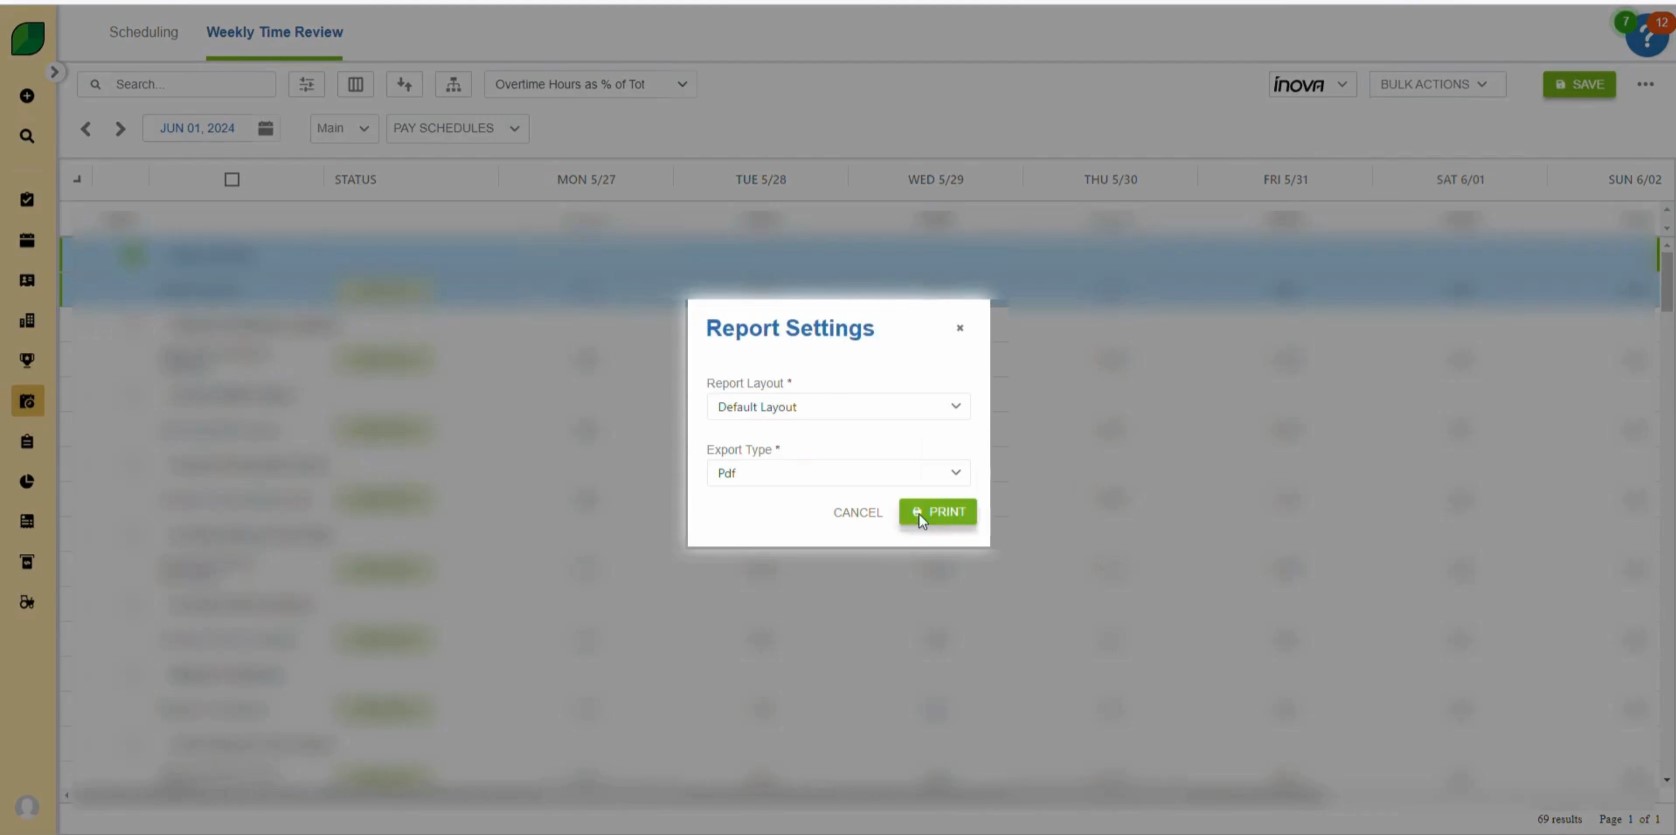
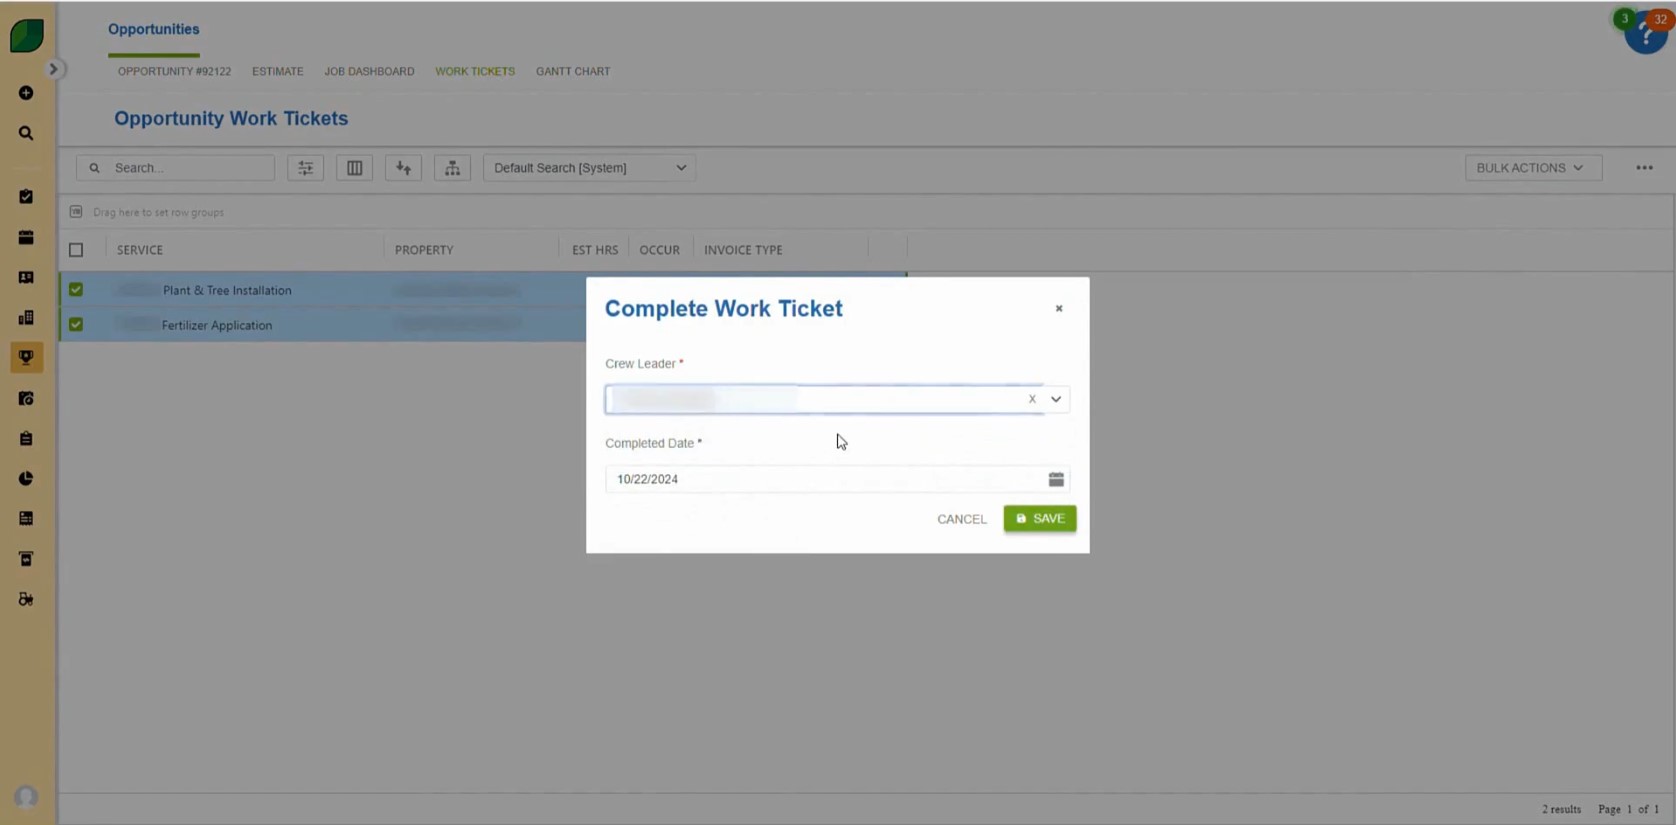
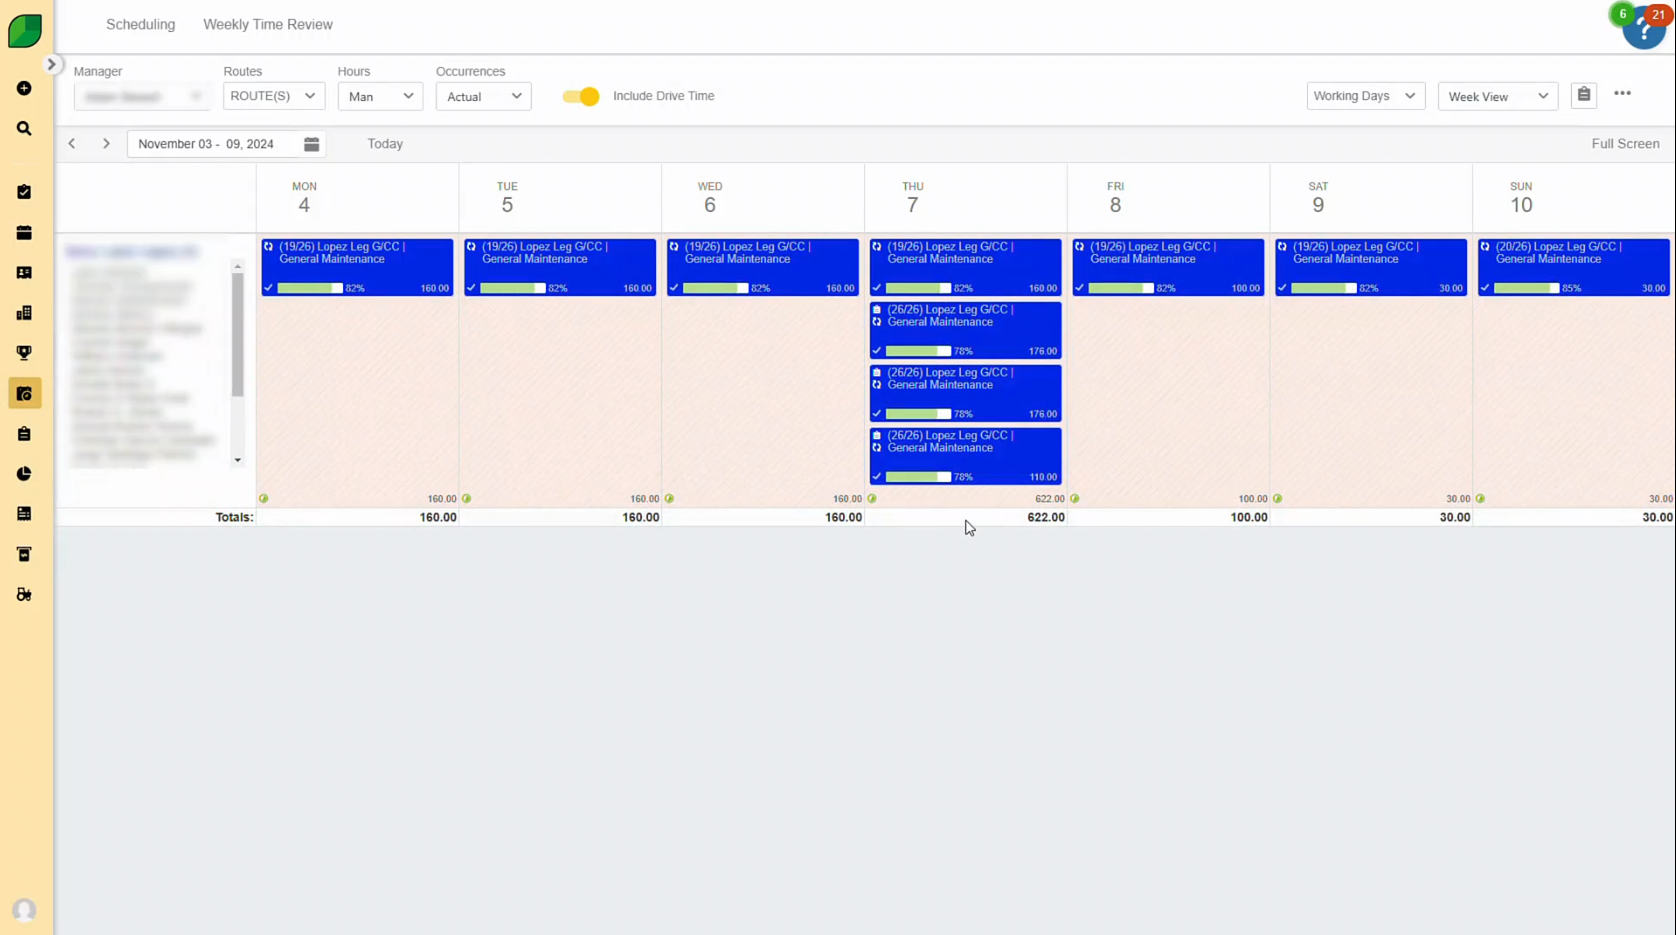
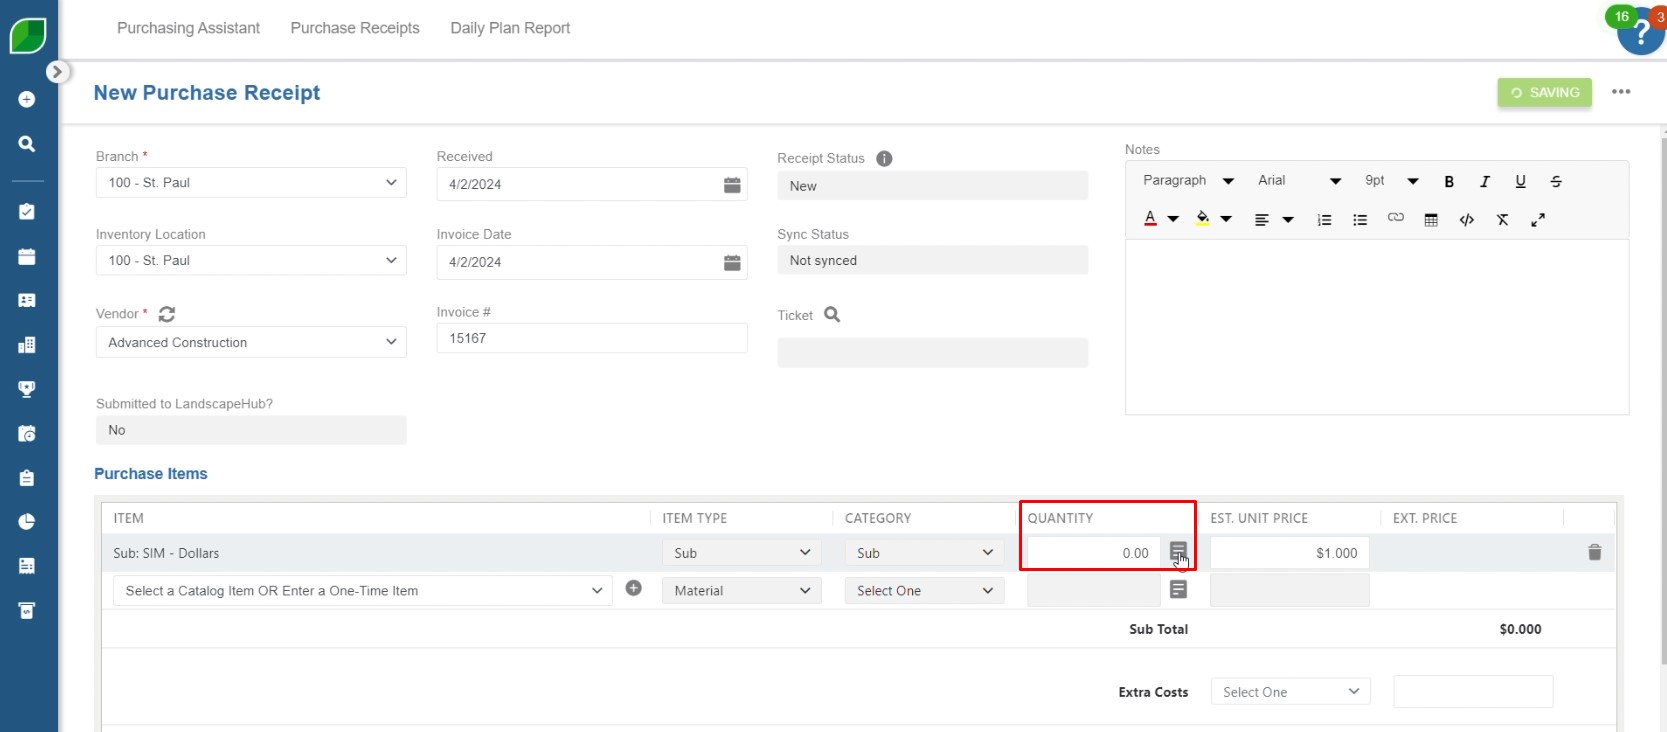
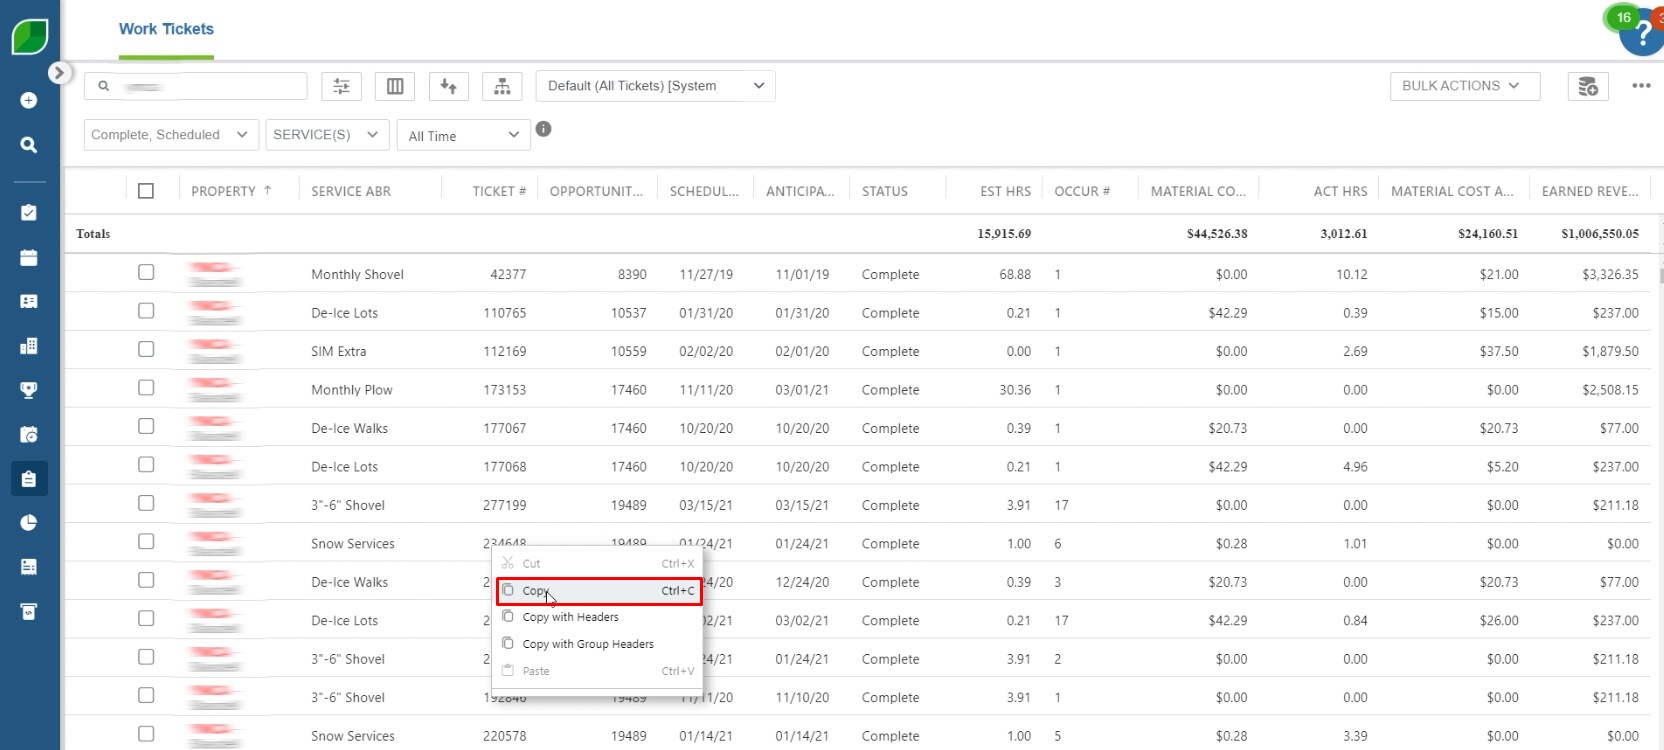
5. Review the Details 

  • Ensure all details are correct and make a copy if necessary for records or additional processing.

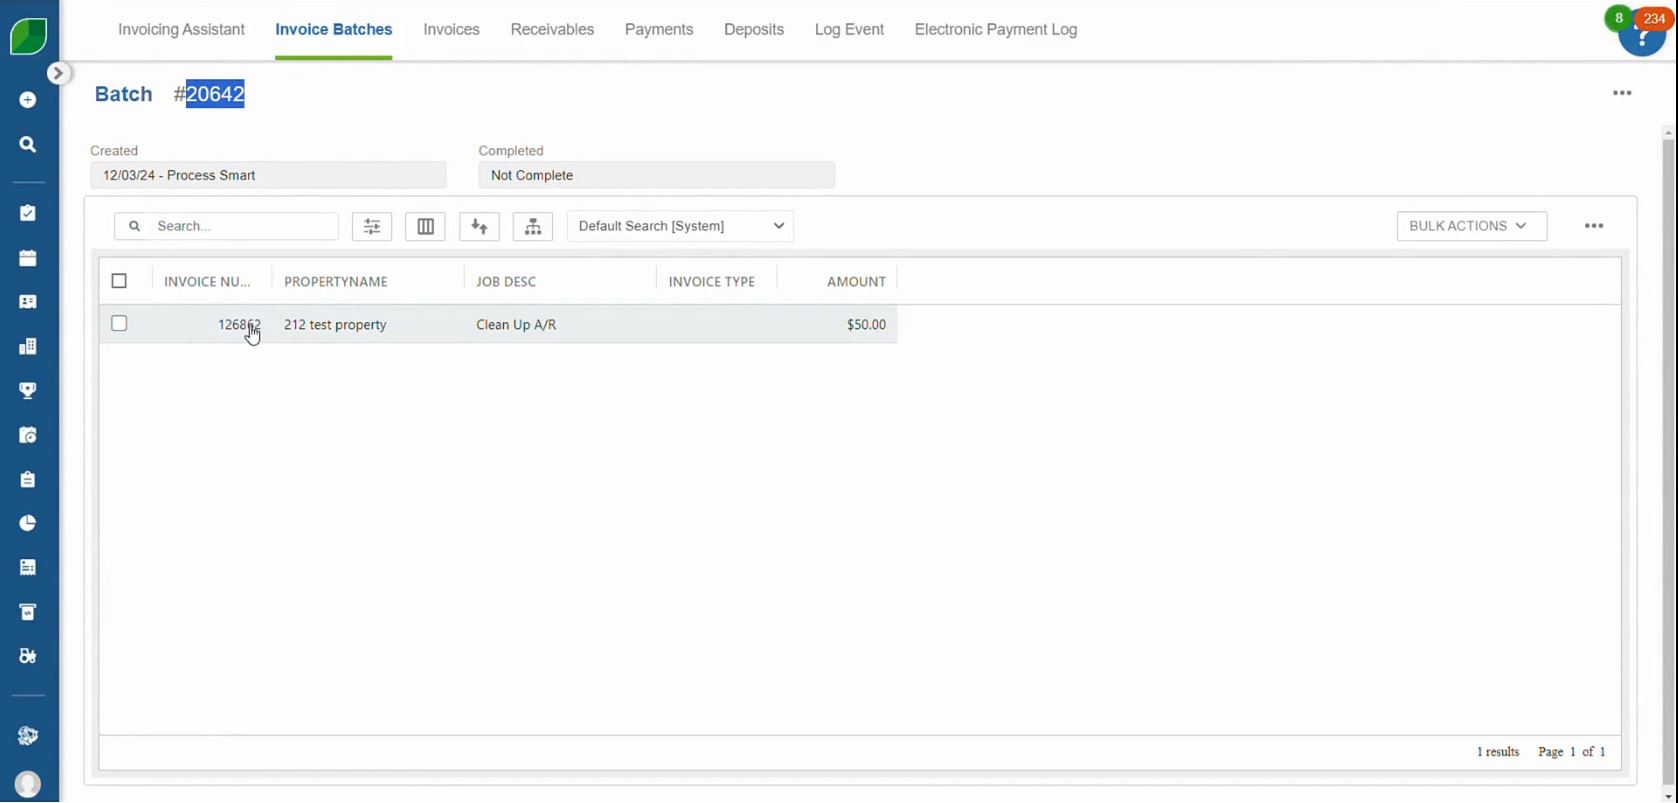
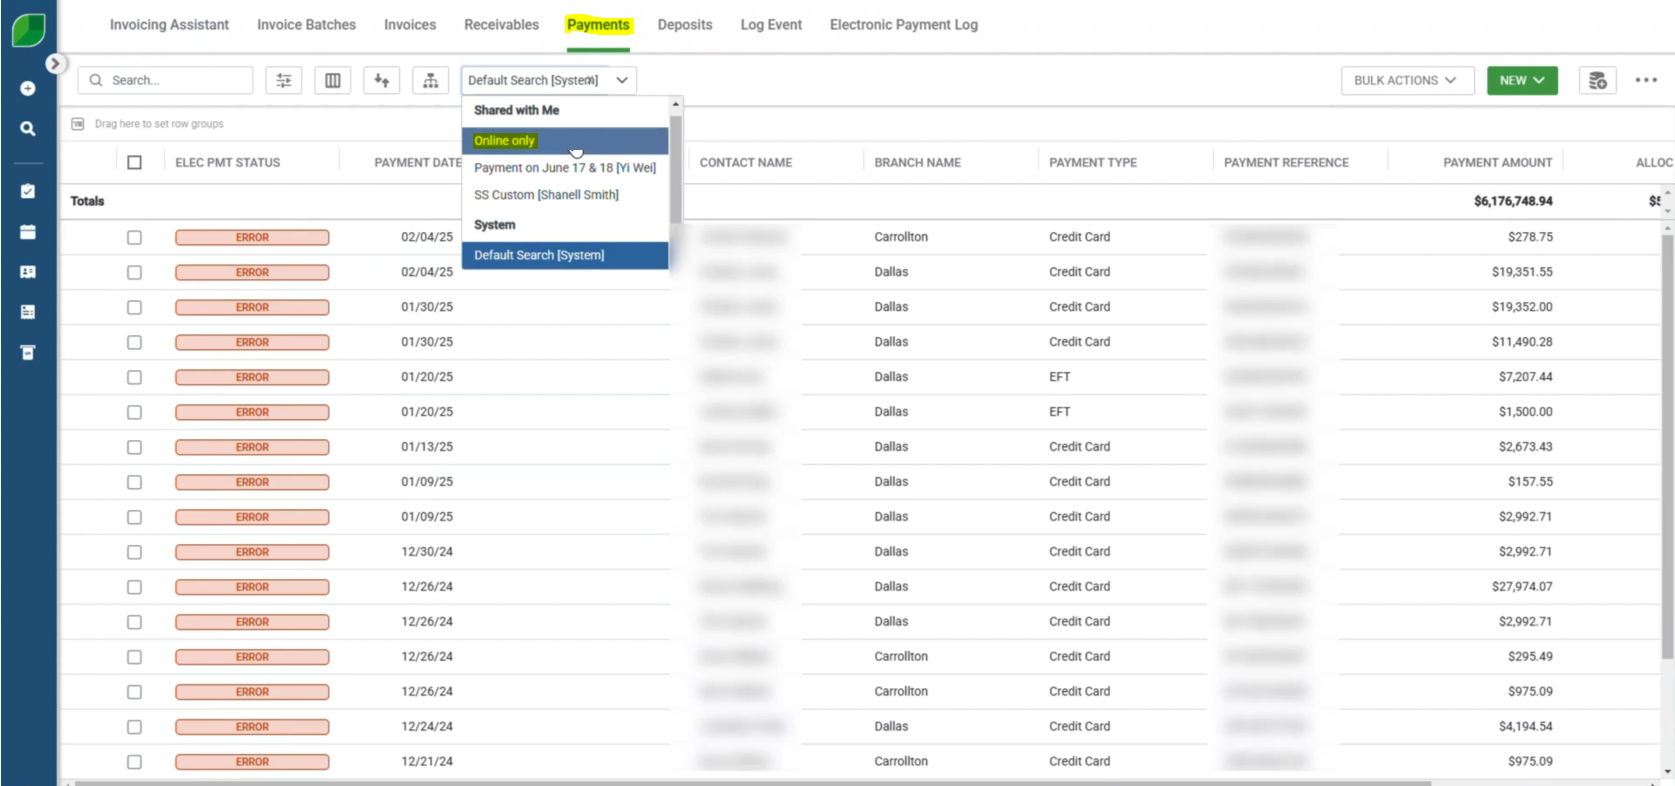
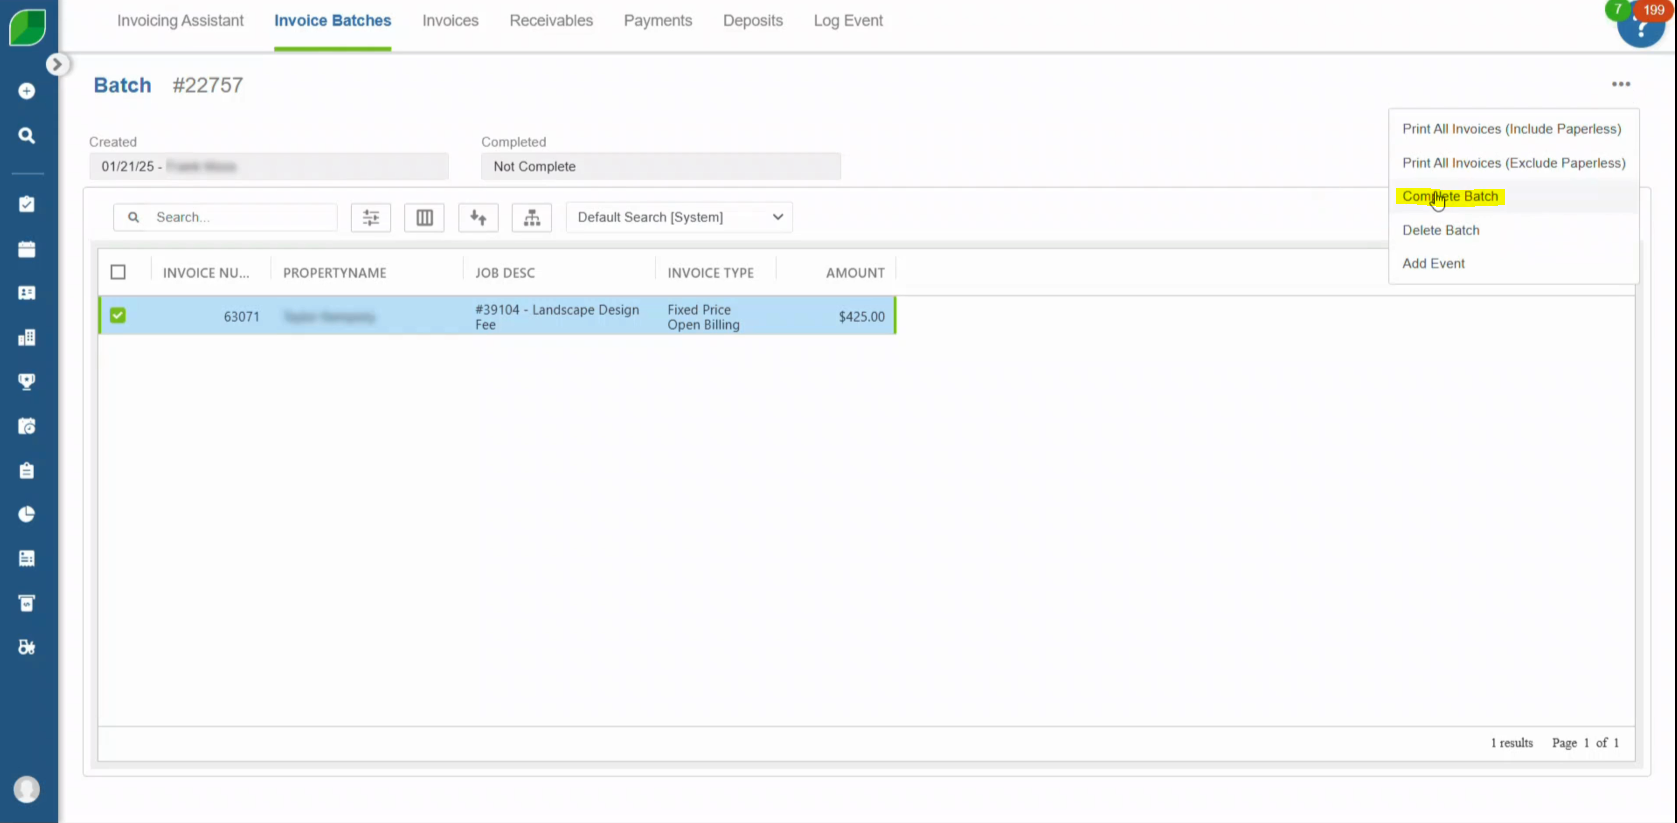
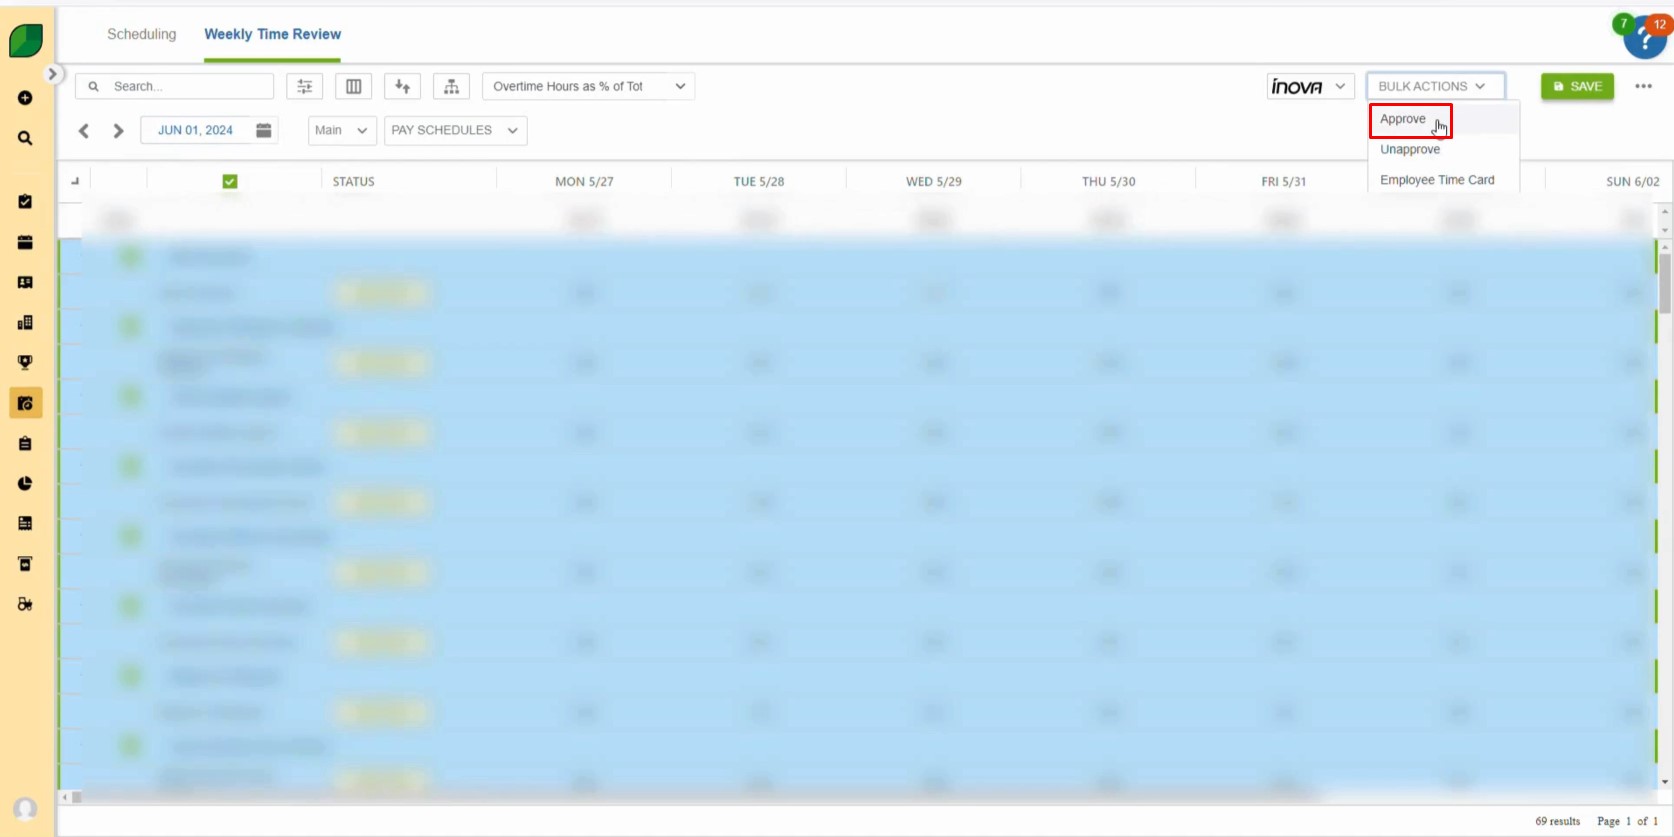
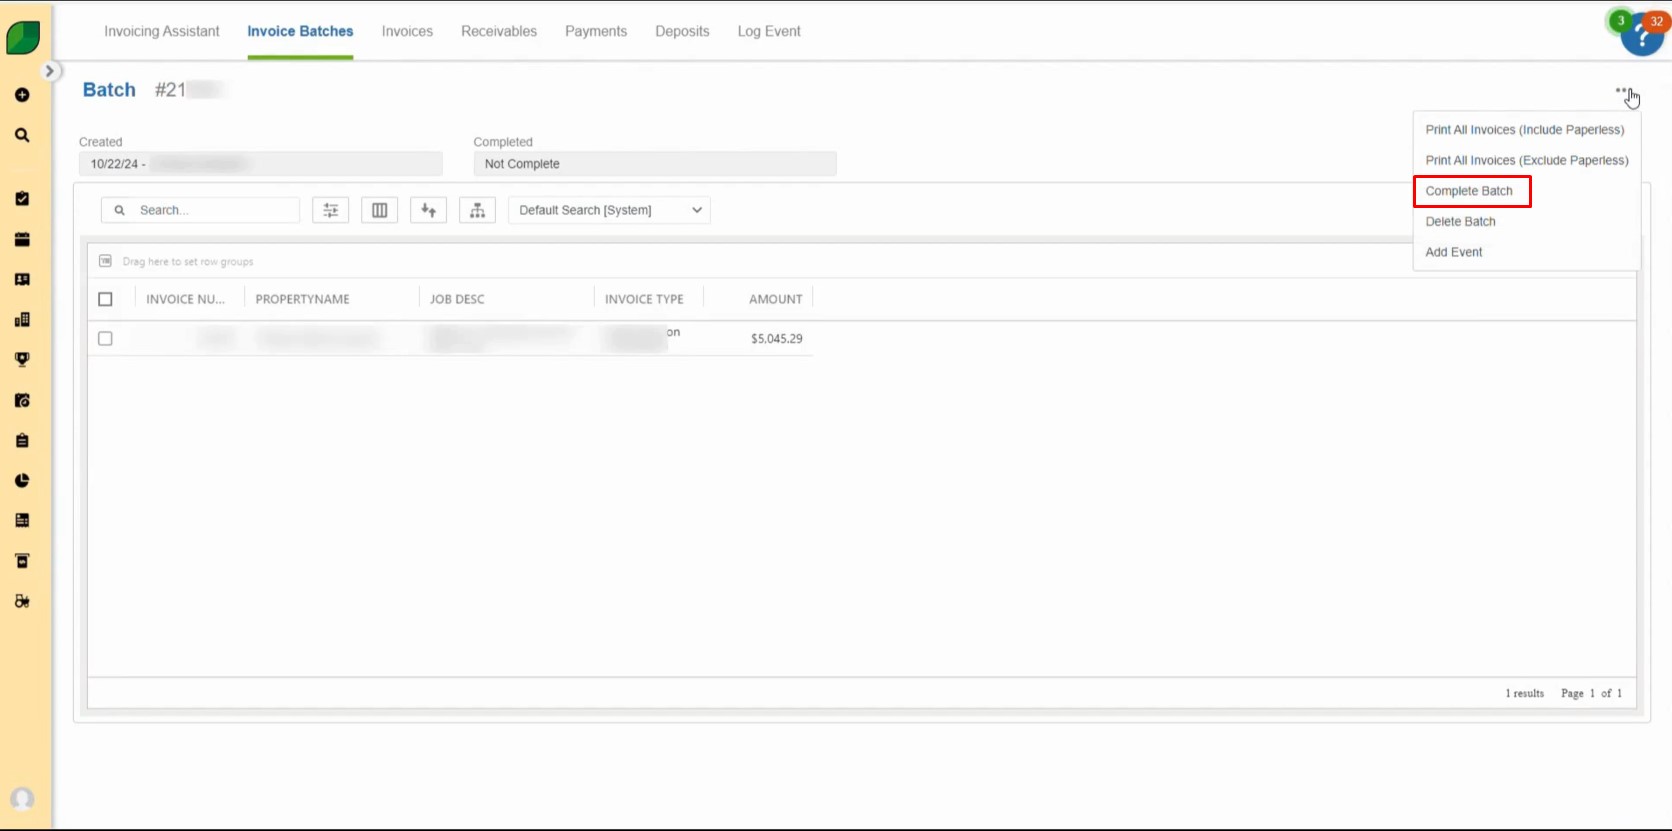
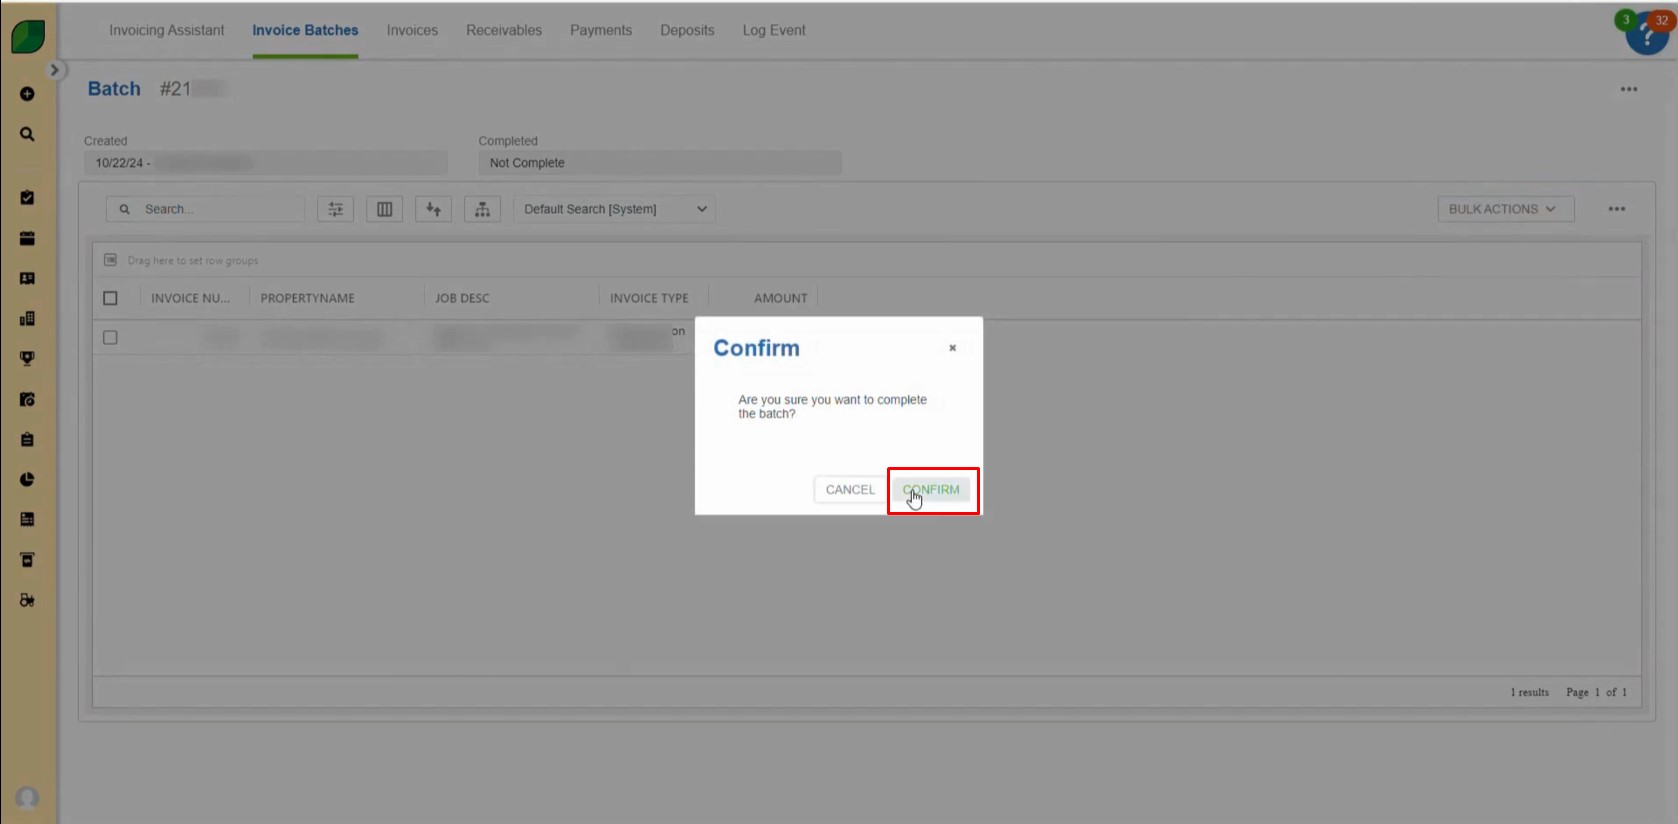
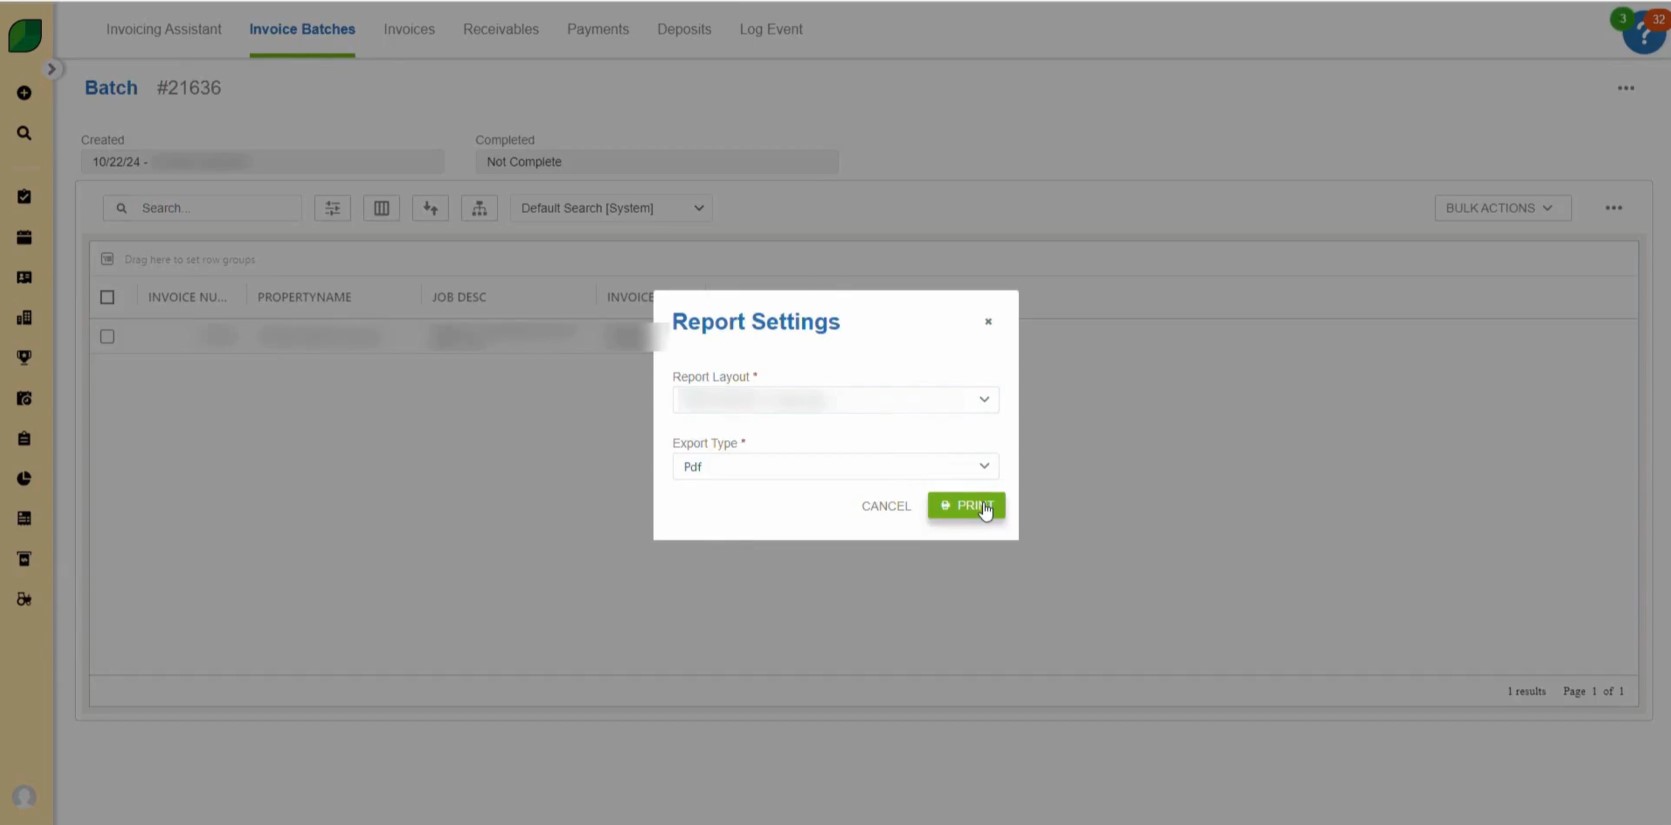
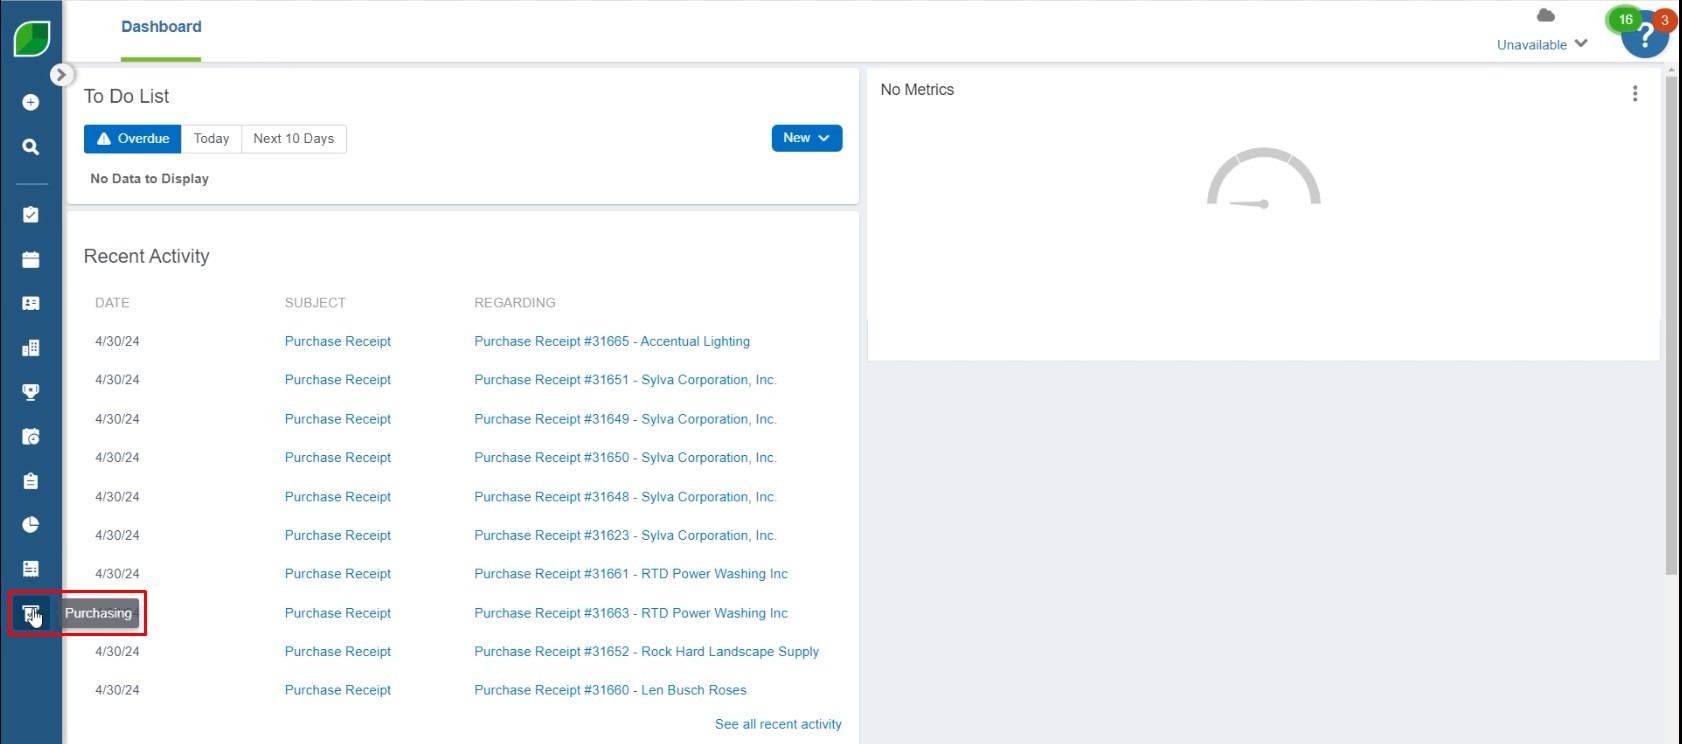
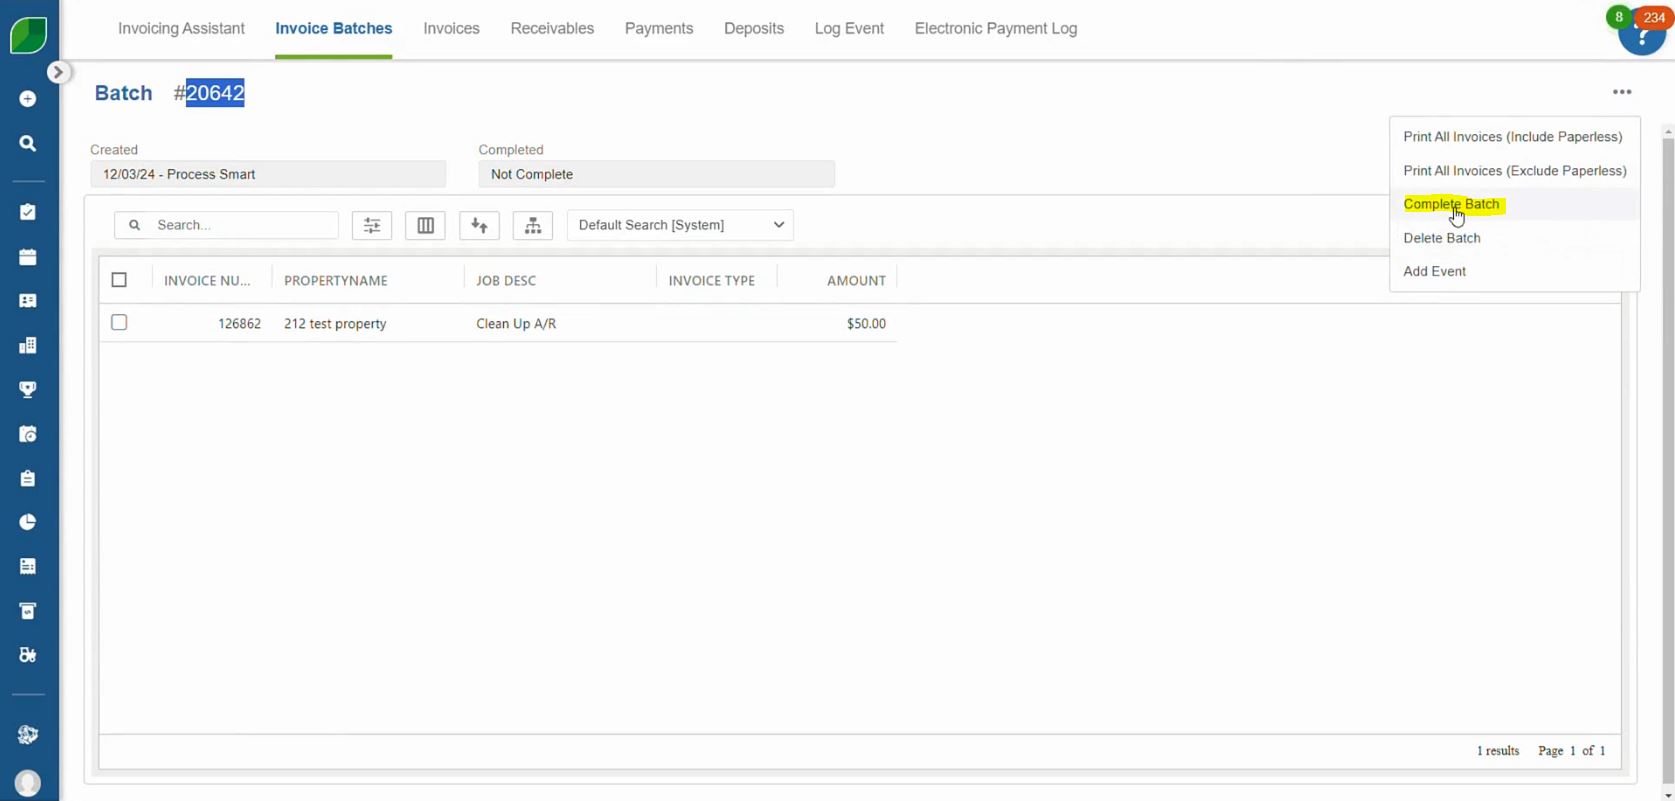
6. Click on the Three Dots and Complete the Batch

  • Finally, click on the three dots in the interface and choose ‘Complete Batch’ to finalize the invoice.

By following the steps in this job aid, you can create miscellaneous invoices in Aspire with confidence and precision. These invoices offer flexibility for billing non-standard transactions while maintaining an organized and efficient accounts receivable workflow. 

If you encounter any challenges or require further assistance, consult the Aspire help portal or reach out to your system administrator. Proper use of miscellaneous invoices will help you manage financial records effectively and support seamless operations in your billing processes.

Download a PDF version of the job aide here.

Categories
Job Aides

Accounts Payable Using Acumatica ERP in Aspire

The Accounts Payable (AP) module in Acumatica ERP is designed to simplify and automate the management of vendor transactions, ensuring timely and accurate payments. This module enables users to efficiently process invoices, handle vendor credits, and generate critical financial reports. Integrated within the broader Acumatica ERP system, the AP module provides real-time insights into liabilities, improves cash flow management, and minimizes manual effort through automation.

Whether entering vendor bills, processing payments, or generating reports, Acumatica’s intuitive interface ensures ease of use while maintaining financial accuracy and compliance.

1. AP Workflow: Entering Vendor Bills (Invoices)

  • Log in to Acumatica.
  • Go to Favorites > Incoming Documents:
  • To enter vendor bills or invoices, follow these steps:

1. Navigation:

Go to Payable > Accounts Payable > Bills and Adjustments in the Acumatica menu.

Accounts Payable

2. Pending Processing:

  • Click on Pending Processing to begin entering the invoice details.

Accounts Payable

3. Fill Out Required Fields:
Select the Document and fill the following fields:

  • Vendor: Select the appropriate vendor from the list. Click on the search Icon to enter Vendor details.
  • Document Date: Enter the invoice date.
  • Due Date: This will be automatically populated based on the payment terms.
  • Description: Enter a brief description of the expense.
  • Amount: Input the total invoice amount.

4. Attach Supporting Documents (Optional):

You can attach any relevant supporting documents, such as scanned copies of invoices or receipts.

2. Copy the Description Number:

Once all required fields are completed and saved, copy the description number from the invoice screen. This will be used in the Aspire dashboard for further validation.

3. Save or Post the Invoice:

  • Click Save to save the invoice for later processing, or
  • Click Remove Hold to post and finalize the invoice.

4. Open Aspire Dashboard:

  • Open the Aspire Dashboard in a new tab of your web browser.
  • Navigate to the Search option.
  • Paste the description number into the search bar.
  • Remove any letters from the description number and keep only the last 4 digits before initiating the search.

Accounts Payable

5. Select the Receipt:

  • In Aspire, locate the matching receipt linked to the description number.
  • Verify the details to ensure accuracy.

Accounts Payable

6. Return to Bills and Adjustments:

  • Go back to the Bills and Adjustments tab in Acumatica.
  • Enter the payment amount in the Payment section.
  • Input the Subaccount ID as required.

Accounts Payable

7. Save or Post the Invoice:

  • Click Save to save the invoice for later processing, or
  • Click Remove Hold to post and finalize the invoice.

Accounts Payable

Managing vendor transactions accurately is essential for smooth financial operations. By following these steps, you can streamline invoice processing, reduce errors, and maintain strong vendor relationships. 

Download a PDF version of the job aide here.

Categories
Job Aides

Payroll Support in Aspire

This job aid provides a comprehensive guide for efficiently handling payroll-related tasks within Aspire. As a process-smart approach, these steps help you manage timekeeping, process payroll accurately, and support compliance with Aspire’s payroll standards. By following these instructions, you can streamline payroll management, address timekeeping discrepancies, and maintain accurate employee records.

Steps for Managing Contacts

1. Access Contacts

    • Begin by navigating to Contacts in Aspire.
    • Sort to Active Contacts and click Confirm.
    • Choose the desired contact from the active contacts list.

2. Apply Contact Type Filter

    • Click on Filters.
    • Under Field Name, select Contact Type and tick the relevant contact type.
    • Click Save.

3. Adjust Display Settings

    • Click on the Display icon (three vertical lines in a box).
    • Scroll down to find Select Options.
    • Choose Employee Number, then drag and drop it to the top of the list.

4. Export Contact Data

    • Click on the Three Dots icon.
    • Choose Export to Excel – Current View to download the contact data.

Steps for Scheduling and Time Review

1. Access Scheduling

    • Go to Scheduling in Aspire.
    • Select Weekly Time Review and choose the appropriate date.

2. Approve Schedule in Bulk

    • Tick the checkbox for the entries you want to approve.
    • Select Approve under Bulk Actions.

3. Set and Print Schedule

    • Select the schedule name, tick the box, and set the Layout of Report.
    • Click Print.

4. Export Employer Time Card

    • Go to Bulk Actions and select the Employer Time Card.
    • Select All and click Print.

Steps for Payroll Reporting

Navigate to Reports

    • Go to Reports and select Standard Reports.
    • Set Filter Type to Accepted Date/Time.
    • Change Filter Type to Custom Equals, then select the desired date.
    • Click Apply.

Steps for Updating Work Time Reviews

1. Open Work Time Reviews

    • Go to Scheduling and select Weekly Time Reviews.
    • Move to the desired day on the schedule.
    • Select Route and Crew Leader.
    • Click Save.

2. Update Schedule Status

    • Tick the schedule type you’re adjusting.
    • Go to Bulk Actions, set to Unapprove, and click Save.

Using Aspire’s payroll management features allows for accurate timekeeping, efficient payroll processing, and thorough reporting. By following these steps, you can help maintain payroll accuracy, address discrepancies, and support compliance with Aspire’s payroll policies, ensuring seamless payroll operations for all employees.

Download a PDF version of the job aide here.

Categories
Job Aides

Managing Accounts Receivable Using Aspire

This job aid outlines the step-by-step process for managing accounts receivable (A/R) in Aspire. 

By following these steps, you can effectively track, process, and communicate invoice details while maintaining accurate records. 

These instructions ensure consistency and efficiency in handling outstanding balances and collections.

Steps for Managing Accounts Receivable in Aspire

1. Generate and Export A/R Aging Report

    • On Aspire, go to Reports and click on Standard Reports.
    • Click on A/R Aging List and apply filters by setting Value Type.
    • Click on the three dots next to Save, select Export to Excel (Current View), and open the file.

Accounts Receivable

2. Format and Analyze the Excel Report

    • Select columns from Accounts to Open Balance.
    • Use Conditional Formatting to highlight values greater than 0 and less than 0.
    • Rename the AR No. column to Invoice No., and sort by color in the Aging 1 column.
    • Highlight the Due Date column and note invoice numbers for further action

3. Search and Access Invoice Details in Aspire

    • Copy the Invoice No. from the Excel file, search for it in Aspire, and click on the Property Name.
    • Navigate to the Contacts section, open the contact, and note the mobile number.

Accounts Receivable

4. Update Property Notes and Add Collection Notes

    • Go to the contact’s Properties, click Edit Property, and update Property Notes with the mobile number and email ID.
    • In Collection Notes, type WP – and prepare for follow-up actions.

Accounts Receivable

5. Print and Save the Invoice

    • Copy the Invoice No. from the Excel file, click on the three dots in Aspire, and select Print Invoices.
    • Choose the desired layout, print the invoice, and save the file with the invoice number.

Accounts Receivable

6. Send Email with Invoice

    • Use the email address from Property Notes.
    • Write the email subject and body, attach the invoice, and click Send.

Following these steps ensures that accounts receivable are processed systematically and records remain up-to-date. 

This workflow helps maintain accountability, supports timely collections, and improves overall financial management in Aspire.

Download a PDF version of the job aide here.

Categories
Job Aides

Invoice Creation in Aspire

This job aid provides step-by-step instructions for completing work tickets and generating invoices using the Aspire system. Following these steps will ensure that all necessary information is properly entered, and work tickets are accurately processed. This guide is essential for managing tasks, ensuring smooth workflow, and completing invoices efficiently.

Steps for Completing Work Tickets:

1. Access Work Tickets:

    • Click on the Work Tickets tab in the Aspire system.
    • Select the relevant tickets by checking the box next to each ticket that needs to be completed.

2. Complete Work Tickets:

    • On the right side, click on the Bulk Actions drop-down menu and select Complete.
    • A “Complete Work Ticket” window will pop up. Under the Crew Leader field, verify the property name that is shown.
    • Once verified, click Save.

3. Invoicing Setup:

    • In the sidebar, click on Invoicing.
    • On the top left of the screen, search for the ticket number (be sure to note this number for reference).
    • Once the ticket status appears, select Address Required.
    • A window will open, prompting you to fill in the address details:
      • Select the State.
      • Enter the Address, Zip Code, and City.
      • After entering the details, click Save.

4. Generating Invoices:

    • After saving the address, the ticket status will change to Ready from Action Required.
    • Select the ticket again and, from the Bulk Actions menu on the right side, click Generate Invoice and then click Save.
    • Next, click on the three dots next to Bulk Actions and select Complete Batch.
    • Confirm the completion by clicking Confirm.

5. Printing the Invoice:

    • The Report Setting window will pop up.
    • Under the report settings, select Invoice DI and click on Print.
    • This process will clear the ticket.

Steps for Payment Processing:

1. Locate and Copy Invoice Number:

    • Go back to Invoices at the top of the page.
    • Search for the invoice by its number or amount.
    • Click on the invoice number, and once it appears, copy it from the top of the page.

2. Apply the Payment:

    • Click on Payments, located next to Bulk Actions.
    • Select New and then choose New Payment.

  • In the new payment window, paste the copied invoice number and click Apply.

  • A payment window will open.
  • Under the Regarding section, enter the invoice number and select the appropriate name.
  • Fill in the Branch and set the Reference Number to “Test Payment”.
  • Finally, click Save.

3. Finalizing the Ticket:

    • After saving, the ticket process will be complete.

By following these instructions, you can ensure that work tickets are properly completed, invoices are generated, and payments are applied within Aspire. Proper completion of these tasks is crucial for maintaining accuracy and ensuring efficient workflow management. Use this guide as a quick reference for handling work tickets and invoicing within the system.

Download a PDF version of the job aide here.

Categories
Job Aides

Bulk Moving Work Tickets in Aspire

In Aspire, the scheduling module simplifies rescheduling multiple work tickets at once. Whether it’s due to weather delays or client requests, the Bulk Visits feature allows you to efficiently move tickets for entire routes to a new date. This guide provides clear and detailed steps to help you bulk move work tickets with ease.

Bulk moving ensures seamless schedule adjustments without the need to update tickets individually. Follow these steps to optimize your scheduling process.

Steps to Bulk Move Work Tickets

1. Go to Aspire Dashboard and Click on Scheduling

  • Log in to Aspire using your credentials to access the dashboard.
  • From the main menu, navigate to the “Scheduling” section to view your scheduled work tickets.

Work Tickets

2. Click on Bulk Visits and then Select the Route

  • Select the “Bulk Visits” option, which is designed for rescheduling multiple work tickets at once.
  • Choose the route containing the work tickets you want to move. This ensures only tickets within the selected route are affected.

Work Tickets

3. Enter New Visit Date

  • Use the calendar picker to select the new date for the rescheduled tickets. This will update the scheduled date for all selected tickets within the chosen route.

Work Tickets

4. Click Save

  • Confirm the changes by clicking “Save.” The system will process the updates, and the work tickets will now reflect the new date in the schedule.

Work Tickets

Work Tickets

The Bulk Visits feature in Aspire streamlines the process of rescheduling multiple work tickets, saving time and effort. By using this tool, you can quickly adjust schedules in response to unexpected events or client needs. For further guidance, visit the Aspire Help Center or contact support.

Download a PDF version of the job aide here.

Categories
Job Aides

Efficiently Managing Purchase Receipts and Work Tickets in Aspire

Managing purchase receipts and work tickets efficiently is crucial for maintaining accurate records within Aspire’s Purchasing system. When you receive invoices from clients detailing location, property, and materials, the process of updating the Purchasing tab in Aspire becomes a streamlined task.

In this guide, we’ll walk you through the essential steps—from creating new purchase receipts based on client information to assigning work tickets and ensuring all data aligns with the corresponding invoice dates. By following these steps, you’ll be able to manage your purchase receipts with ease, ensuring your records remain accurate and up-to-date.

Steps to Manage a Purchase Receipt

1. Click on ‘Purchasing’

  • Begin by logging into your Aspire account.
  • Navigate to the ‘Purchasing’ section from the dashboard.

2. Select the ‘Branch’, ‘Inventory Location’, and ‘Vendor’

  • Choose the appropriate branch from the dropdown menu.
  • Select the correct inventory location and vendor for the purchase.

3. Select the receiving date on ‘Received’ and add the invoice date on ‘Invoice Date’

  • Enter the date the items were received under the ‘Received’ field.
  • Input the invoice date in the ‘Invoice Date’ field.

4. Entering Invoice and Item Details

  • Add the Invoice Number: Enter the invoice number in the designated field.
  • Go to ‘Purchase Items’: Navigate to the ‘Purchase Items’ section to start detailing the items received.
  • Enter Item Details: Fill in the necessary details about the purchased items, including descriptions, quantities, and any other relevant information.

5. Click on ‘Quantities’

  • Click on the ‘Quantities’ button to specify the quantity of each item.

6. Hover over the settings icon near quantities in the ‘Purchase Allocation’ tab

  • The ‘Purchase Allocation’ tab will appear.
  • Hover your cursor over the settings icon next to the quantities and click on it.

7. Copy the ‘Ticket’ number from the ‘Work Ticket’ page

  • A ‘Work Ticket’ page will open.
  • Copy the ticket number displayed on this page.

8. Go to ‘Work Ticket’ and enter the ticket number in the search bar

  • Navigate to the ‘Work Ticket’ section.
  • Paste the ticket number into the search bar and open the ticket profile.

9. Enter the quantity of purchase item in ‘Quantities’ on the ‘Purchase Allocation’ tab and click ‘Save’

  • Once again, the ‘Purchase Allocation’ tab will appear for the selected ticket.
  • Enter the quantity of the purchased item in the ‘Quantities’ section.
  • After entering the quantities, click ‘Save’ to confirm the allocation.

10. Click ‘Save’ on the ‘Purchase Receipt’

  • Finally, ensure all information is correct and click ‘Save’ on the ‘Purchase Receipt’ to complete the process.

By following this step-by-step guide, you can efficiently manage both purchase receipts and work tickets in Aspire, ensuring that all details are accurately recorded and aligned with your client’s invoices. This streamlined approach not only keeps your purchasing records organized but also enhances the overall efficiency of your operations.

Download a PDF version of the job aide here.